Create and manage a website
Use Websites in Flowize to import HTML files and assets, choose a template, and customize its content in the website editor. The editor works with the content you provide in the ZIP file.
New websites are published automatically. Finish the first page before sharing its public URL. Saving edits to a published website immediately updates the published website.
Import a website
Prepare a .zip file containing your website's HTML files and supporting CSS, JavaScript, and images.
The website builder cannot load page content dynamically from a backend or external request. Include the complete page HTML in the ZIP file.
- Open Websites under Contents in your project.
- Select New Website.
- In Configuration, enter a Name under Website Details.
- Select Choose File and choose your ZIP file.
- Select UPLOAD.
- Under Select the Template file, select the HTML file to use as your template.
- Select Save to open the website editor.
- In the template, select a page container and save the template. This creates the Index content page.
- Open Index from Website Menu, add the content you want visitors to see, and save the page.
- In Index's Content Configuration, open the Public URL to check the page and its links.
If the public URL returns a 404 after import, check that you have selected a page container and saved the Index page. The Published status alone does not confirm that a page is ready to view.
Uploading a new ZIP file for an existing website deletes the current website and all its pages.
Open and navigate the editor
For an existing website, open its Actions menu in the Websites overview and select Open Editor. You can also select Open Editor from the website's configuration page.
The Website Menu shows the website and its template. The Template Manager lists the template files, and Template Configuration contains the template's Name and Description.
Select an element on the canvas to display its toolbar and settings. The breadcrumbs below the canvas show the selected element's containing structure.
Editor tools
Use the toolbar controls to manage pages, edit content, and preview the website.
| Control | Icons | Use |
|---|---|---|
| Website Menu |  | Add and delete website pages. |
| Device Type |     | Preview the website at different device sizes. |
| Hidden Items |  | Show or hide hidden elements in the editor. |
| Grid |  | Show or hide grid guides. |
| Fullscreen |  | Expand the editor to fullscreen. |
| Preview |  | Open a preview in a new tab. |
| Undo and Redo |   | Step backward or forward through edits. |
| Manage Assets |  | Add, delete, or open website assets. |
| Header |  | Change the page title. |
| Content Configuration |  | Edit content settings, such as names and descriptions. |
| Website Blocks |  | Add layouts and elements, such as tables, links, and buttons. |
| Block Configuration |  | Connect forms and links to flows. |
| Styles |  | Change the styles of HTML elements. |
| Layers |  | View and arrange the website's element tree. |
Edit template content
Select a page container
The page container is the part of the template where Flowize displays a content page. To set it up:
- In the template editor, select the container that should hold the page content, such as
<main>. - Select Container Manager and choose the page container option.
- Confirm the change, then select Save in the template editor.

Flowize creates an Index content page when you save the page container. Open Index from Website Menu and add content inside the selected container. Content shown in the imported template is not automatically added to Index. You can use Website Blocks to build the page or edit a block's HTML to reuse markup from your ZIP file. Save Index to update the public page.
Changing the page container affects the public website's output.
The body element cannot be selected as a page container.
Before sharing the public URL, test links from the imported HTML. A link to a file such as index.html can lead to a 404 because Flowize serves the content page at its public URL. In Block Configuration, point the link to the appropriate Flowize page URL. For a link to the site's home page, ./ works from the site root.
Create a block container
A block container lets you display different content on the current page without redirecting the visitor to another page.
- Open a page and select a container.
- Select Container Manager.
- When prompted to set it as a page container, select No, set as Block container.
- Enter a unique name and save the change.
Add a block to a block container
- Open Website Menu and expand the page containing your block container.
- Expand the block container and select Add a new Block.
- Customize the block and save the page.
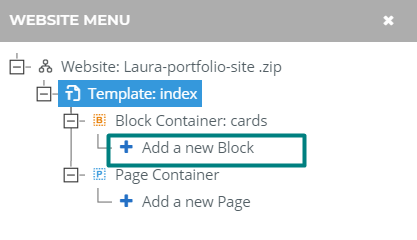
Use the Load block tool in your flow to display the block when needed.
Create reusable blocks
Reusable blocks let you use the same content on multiple pages.
- Open Website Menu and select BLOCK ASSETS MANAGER.
- Choose the HTML file containing the content you want to reuse.
- Select the element you want to save as a block, then select its save-as-block option.
- Enter a unique name and select Save.
Your reusable blocks are available in the Website Blocks tool.
Add pages to your website
- Open Website Menu, right-click Index, and select Add Page.
- Open Content Configuration and edit the Name and Friendly URL as needed.
- Save the page.
To visit the page, open its Public URL in Content Configuration.
Add content with Website Blocks
Open Website Blocks and drag elements onto the canvas.
| Group | Use |
|---|---|
| Layout | Add sections, columns, headers, and footers. Start here to organize the page structure. |
| Typography | Add links, text, and headings. |
| Basic | Add link buttons, link blocks, grid items, style buttons, and dividers. |
| Forms | Add a ready-made form. |
| Tables | Add a table. Choose the number of rows and columns, then select Create Table. |
| Website Blocks | Add reusable blocks you have already created. |
| Media | Add images and videos. |
Connect forms and links to flows
Use Block Configuration to assign variables to form inputs, start a flow, or send a status to a flow from a form or link.
To configure an input variable:
- Select an input element in a form.
- Open Block Configuration.
- Enter a name and save it.
Flowize creates a variable in the format @site...@ that you can use in a data schema, table, or flow.
To start a flow or send a status when a visitor submits a form, first create the flow, then:
- Select the submit button in the form.
- Open Block Configuration.
- Select Start a Flow or Send status to the flow.
- Choose the flow from the list.
- Choose whether to disable the button after it is clicked and whether to show a loading page.
Style an element
Select an element on the canvas, then open Styles to adjust its appearance.
| Setting | Use |
|---|---|
| Classes | Add CSS classes, including classes from libraries such as Bootstrap. |
| Layout | Set position and display properties. |
| Dimension | Adjust height and width. |
| Typography | Set the font, size, color, alignment, and text decoration. |
| Indent | Adjust margins and padding. |
| Background | Set the background color and opacity. |
| Border | Change borders. |
| Effects | Set transition and transform properties. |
Arrange layers
Open Layers using the stacked-layers icon in the top toolbar. Expand branches to find nested elements, then select an item to locate it on the canvas.
Drag an item's move handle up or down to reorder it. Use its eye icon to show or hide the element.
Use website tools in a Flow
Open your flow and add Websites object and configure the function you need.
| Tool | Use |
|---|---|
| Close session | End the data record session used to render the website page. |
| Get page URL | Retrieve a page URL for use in another application, such as an email. |
| Load Block | Load a block into a block container without reloading the entire page. |
| Load Page | Redirect the browser to a page or load the page inside a container. |
| Load Page by URL | Redirect the browser to a URL. |
| Privacy level | Set the active security tags used to control access to private pages. Visitors without matching tags are redirected to the configured page. |
Close session
Use Close session to end the website's data record session and redirect the visitor.
- Add Close session to the flow and open its configuration.
- Enter a name and choose the website.
- Choose the page to display after the session closes.
- Select Save.
Get page URL
Use Get page URL to retrieve the URL of a website page.
- Add Get page URL to the flow and open its configuration.
- Enter a name, then choose the website and page.
Use the tool's response variable to pass the URL to the next application in your flow.
Load block
Use Load block to display a block without reloading the entire page.
- Add Load block to the flow and open its configuration.
- Enter a name and choose the website containing the block.
- Under Choose a Block container, select the target container.
- Under Choose a Block, select the block to load.
Load page
Use Load page to display another website page.
- Add Load page to the flow and open its configuration.
- Enter a name, then choose the website and page.
- Under How to load the page?, choose a loading method:
- Redirect the user to the new page: Navigate to the selected page.
- Inside a container in the current page: Load the page into the selected container on the current page.
- If loading inside the current page, choose the target container.
- Select Save.
See Select a page container to configure a container.
If you use your own domain and have uploaded an SSL certificate for it, enter the domain in Custom domain so the tool uses it in the generated URLs.
Privacy level
Use Privacy level to set the active security tags for access to private website pages.
First, configure page security in the website editor:
- Open the website under Contents > Websites.
- Select a link or a button inside a form, then open Content Configuration.
- Set Page security to Yes.
- Add Security Level Tags, such as
admin. - Choose the page to display to visitors who do not have the required tags.
Then configure the flow tool:
- Add Privacy level to the flow and open its configuration.
- Add the security tags you created in the website editor to make them active.
- Choose the website.
Visitors with matching tags can access the private page. Other visitors are redirected to the page you configured.
Website status
Use Website status to listen for a status sent when a visitor interacts with a website link or form button.
-
In the website editor, select the link or form button.
-
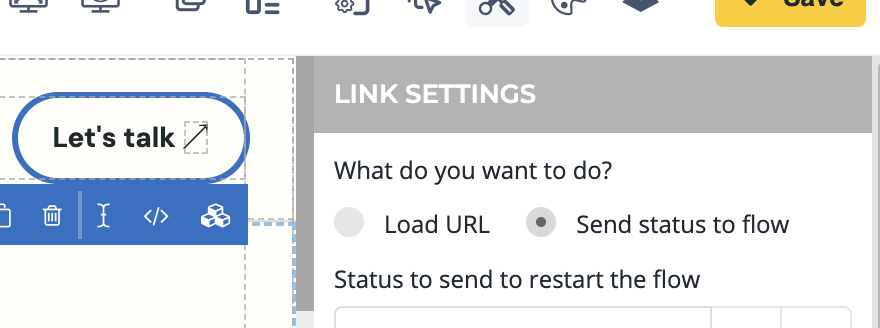
Open Block Configuration and select Send status to the flow.
-
Configure the status to send.
-
Add Website status to your flow and configure it to listen for that status.
Enter the status name exactly as it appears in the website configuration.
Website events
This section is for developers adding custom JavaScript behavior to websites used in Flowize. These events are configured in your website's source code.
Use the following events to respond to page loads, form submissions, and visitor interactions.
| Event | Trigger |
|---|---|
fw:page:loaded | A page loads into a container through AJAX. |
fw:page:redirect | A page is about to redirect. |
fw:block:loaded | A block loads into a container through AJAX. |
fw:form:submitted | Before a form is submitted or its submit button is clicked. |
fw:form:success | A form submission succeeds. |
fw:form:error | A form submission fails. |
fw:form:complete | A form submission finishes, whether it succeeds or fails. |
fw:button:disabled | A button is disabled. |
fw:link:clicked | A link is clicked. |
fw:link:disabled | A link is disabled. |
Page events
Use page events to run code when a page loads or before it redirects.
Page loaded
The fw:page:loaded event fires when a page loads into a container through AJAX.
$(document).on('fw:page:loaded', function() {
    // Your code goes here.
});
Use the event data to access the page ID and name:
$(document).on('fw:page:loaded', function(ev) {
    // ev.detail.id: page ID
    // ev.detail.name: page name
});
Page redirected
The fw:page:redirect event fires just before the page redirects.
$(document).on('fw:page:redirect', function() {
    // Your code goes here.
});
Block loaded
The fw:block:loaded event fires when a block loads into a container through AJAX. Use its data to identify the block and target container.
$(document).on('fw:block:loaded', function(ev) {
    // ev.detail.id: block ID
    // ev.detail.name: block name
    // ev.detail.container_name: container where the block loaded
});
Form events
Use form events to respond to submission, success, failure, or completion.
Form submitted
The fw:form:submitted event fires before the form is submitted or its submit button is clicked.
$('form').on('fw:form:submitted', function() {
    // Your code goes here.
});
Form submission success
The fw:form:success event fires when a form submission succeeds.
$('form').on('fw:form:success', function() {
    // Your code goes here.
});
Form submission error
The fw:form:error event fires when a form submission fails.
$('form').on('fw:form:error', function() {
    // Your code goes here.
});
Form submission completed
The fw:form:complete event fires when a form submission finishes, whether it succeeds or fails.
$('form').on('fw:form:complete', function() {
    // Your code goes here.
});
Button event
The fw:button:disabled event fires when a button is disabled.
$('button').on('fw:button:disabled', function() {
    // Your code goes here.
});
Link events
Use link events to respond when a link is clicked or disabled.
Link clicked
The fw:link:clicked event fires when a link is clicked.
$('a').on('fw:link:clicked', function() {
    // Your code goes here.
});
Link disabled
The fw:link:disabled event fires when a link is disabled.
$('a').on('fw:link:disabled', function() {
    // Your code goes here.
});
Manage website availability
Unpublish a website
- Open the published website's Actions menu and select Unpublish.
- In Unpublish this site?, select Unpublish to confirm.
The website changes to Draft. Users lose access until it is republished. To republish a draft website, use Publish in its Actions menu.
Delete a website
If the website is published, unpublish it first. Delete is available when the website is in Draft status.
- Open the website's Actions menu and select Delete.
- In Delete Site?, type
DELETEin the confirmation field. - Select Delete.
Deleting a website is permanent and cannot be undone.
Was this article helpful?