Flows
Flows are the most crucial part of our platform. It's where we define the steps to be performed throughout our custom process. Each flow has only one start point and one or more endpoints, as we may perform different actions depending on the output of others. The overview contains all the flows which have been set up in our project.
A flow can have one of the following statuses:
| Status | Description |
|---|---|
| DRAFT | This is the initial status of any flow when we create it. The flow won't process any data record while in this status |
| READY | The flow is ready to process data records and cannot be edited |
| PAUSED | The flow won't process new data records until it is resumed |
| INACTIVE | The flow won't receive new data records anymore |
Flows can become inactive only once they have been PUBLISHED. However, you can re-activate a flow anytime.
Flow actions
For each flow, you can apply some Actions that can vary depending on its status:
| Status | Action |
|---|---|
| Edit/View | It will take us to the flow designer view. Also double-clicking on the table row will perform this action. If the flow is Published, the "Edit" option won't be available |
| Copy | It generates a copy of the flow, but you need to provide a new name, so it's independent from the source |
| Test | It allows you to insert test data records into the flow |
| Publish | It publishes the flow, and it's only available if it's in status "Draft" |
| New version | It creates a new Draft version of the flow, so you can make changes to it without affecting the current Published flow. If you "Publish" this new version, all new data records will go to the new version of the flow, while the data records that started in the previous version will keep on running of that version |
| Pause | It pauses this version of the flow. This means that no new data will go to this flow, and if you have a previously published version of the flow, new data records will run in that previous version. It is very handy when you notice that the current version of your flow has an error and you want to avoid data records to run on it while you fix the errors in a new version |
| Resume | It resumes this version of the flow |
| Delete | It deletes a flow. Only flows that are in status "Draft" or "Inactive" can be deleted |
| Deactivate | It sets the version of the flow as "Inactive" |
Flow versions
A flow can have more than one version. However, the latest running version is the only one that will receive data. That one is always shown at the top of this list.
Creating a new flow
When we click on the "New Flow" button in the flow overview, we are redirected to the flow designer. Here we can start designing our flow by merely dragging and dropping items from the flow palette that is located to the right.
A flow can only be modified if its status is DRAFT. If you already have it Published, then you can only change the values of the parameters of the Apps, but not add, remove or move Apps. In order to do that, you will have to create a new version.
If the Flow was Published, and you clicked on “Edit this versión”, remember that after changing an App parameter, you have to save the Flow to save the changes in that versión.
The flow palette is where all the Apps are, and we can find it categorised in different tabs:
| Tab | Description |
|---|---|
| Apps | It's the list of all Marketplace and Custom Apps that have been installed |
| Webhooks | Here, you will find all the webhooks that have been set up |
| Database | Here, you will find all the Apps related to the Keystores, Tables and Data Gateways that have been set up |
| Tools | It's the list of all Tools Apps that have been installed |
| System apps | They are a bunch of tools pre-installed by default in any new account (Decision, End, Loop, Move to flow, Run a flow and Scheduler) |
Error Handling flows
They are a special type of flow which are used for handling errors in flows. The error handling flow is a special type of flow that allows you to handle errors. If something goes wrong during the execution of a data record, it will be managed by its error handler.
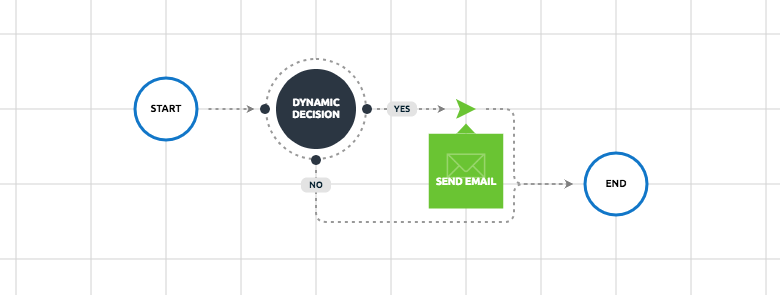
In this example, we are going to set up a simple flow that is going to send an email to a bunch of customers and an error handler that will come into play in case the process fails. These are the steps that are going to be covered:
Set up our data scheme
Our data scheme will be composed by name (customer’s name) and email (his email). It must basically look as follows (for more information on how to set up our JSON data scheme, please visit this link):
{
  "name": "",
  "email": ""
}
Create our interface
The next step is to set up the structure of the data that our interface will receive and map it against our data scheme. In this example, we are going to call it email sender and it is going to use exactly the same payload as our data scheme. For further information on how to create an interface, please refer to this page. If you need to know more about how to configure an interface, please visit this post.
Install and configure the needed apps
We need to install and configure the apps SMTP Emails (it will send the email to our customers) and SlackChannel (this one will send a notification to a Slack channel if an email cannot be sent).
For further information on how to install an app, please refer to this page. If you need to know more about how to configure an app, please visit this post, and if you need more information about how to configure a function, please refer to this link.
Build the error handler
Now we are going to build the flow that will handle errors in our main flow. This error handler will simply send a notification to a Slack channel with the following text:
Error in Email Sender flow:
Customer: `@data.name@`
UUID: `@system.datarecord.uuid@`
HTTP code: `@system.error.httpcode@`
Task name: `@system.error.task_name@`
Message: `@system.error.message@`
Flow name: `@system.error.flow_name@`
Body: `@system.error.body@`
Date: `@system.error.date@`
As you can see in the snippet above, we are going to output some system variables which are provided by the platform (if you need more information about variables, please visit this link).
Once we have configured the object, we save the flow. We name it Error Handler, and we save it as an error handler by enabling the corresponding switcher as you can see in the screenshot above.
Build the Flow
Finally, we build our Email Sender flow which is simply going to send an email. Once we have configured the object, we save the flow. And we basically choose the error handler that we previously set up.
Test the process
In order to test the process, we are going to send a bunch of customers that are going to receive this email. The email of one of these customers will be empty so that it will cause an error in the flow, and therefore it will be handled by the error handler. In this case, we are going to send the following CURL request to insert the batch of records:
curl -X POST \
  https://{{platform_api_url}}/v1/batch \
  -H 'Cache-Control: no-cache' \
  -H 'Content-Type: application/json' \
  -H 'X-Apikey: {{put_here_your_api_key}}' \
  -H 'X-App: email_sender' \
  -H 'X-Batch-Status: ready' \
  -H 'X-Flow: Email sender' \
  -H 'X-Scopes: batch' \
  -d '[
    {
          "name": "John Doe",
      "email": "john.doe@email.com"
    },
    {
      "name": "Jane Doe",
      "email": ""
    }
]'
You must replace {{platform_api_url}} by the API URL and {{put_here_your_api_key}} by your API key This request will
insert two records. When the second record is processed, the email function will fail as the email is empty. In this
case, our error handler flow will come into play, and therefore we will receive the corresponding notification in the
Slack channel that we specified.
Congratulations! Now you are successfully handling errors in your flow.
Error Handler for every app in the flow
When using apps inside your flow, you can change the app's behavior by defining how they handle the error. This tool is handy as this lets you continue or stop your flow according to your needs. Suppose, in some cases, even if an app fails and you still want to continue the flow, you can do it using this feature.
How to use error handler
To use this feature - go to your flow then click apps > error handle
Then click Yes to configure it.
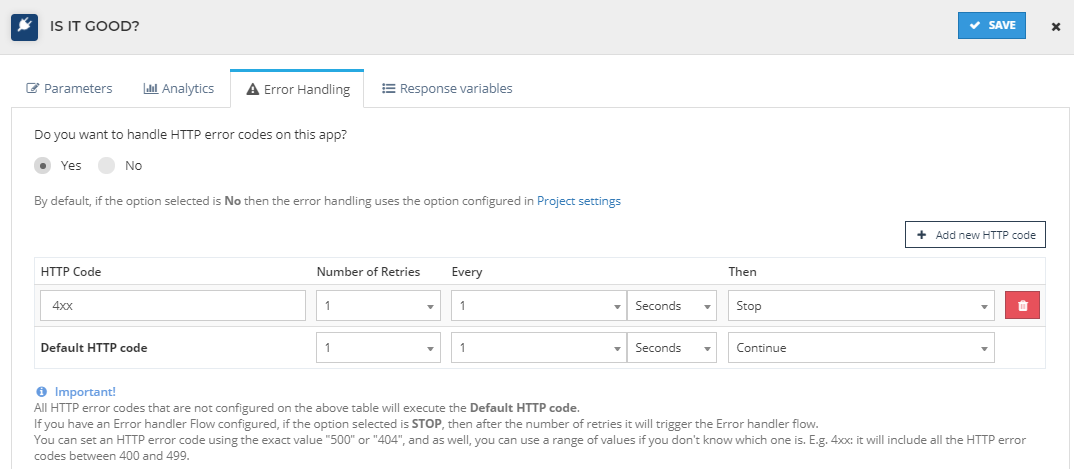
Generally, 2xx codes are set to continue the flow, and 4xx are set to stop the flow. Modify it According to your needs.
Parameters for error handler
| Field | Description |
|---|---|
| HTTP Code | The outcome of the app. Generally, the codes are 200,301,401. If you are not sure about the exact code, you can use XX instead of the number. example-4xx/3xx. Here xx means 00-99 |
| Number of Retries | How many times do you want this to execute |
| Every | How often do you want to execute it |
| Then | You can choose to continue or stop the flow using this. |
Common HTTP Codes
| Code | Description |
|---|---|
| 200 | The request has succeeded |
| 201 | The request has succeeded, and a new resource has been created as a result |
| 300 | The request has more than one possible response |
| 301 | The URL of the requested resource has been changed permanently. |
| 400 | Bad Request. The server could not understand the request due to invalid syntax. |
| 401 | unauthorized / unauthenticated |
| 403 | The client does not have access rights to the content. |
| 404 | The server can not find the requested resource |
| 4xx | xx means 00 to 99. Use it if you want to cover whole range |
Learn more about HTTP Code here
System tools in the flow
System tools are tools that are given by flowize in flow to manage our flows easily. To use them, Go to your flow and Take a look on the right side of the page
Decision
The decision object allows us to define one path or another within our flow depending on a condition.
There are two different kinds of decisions available:
Generic decision
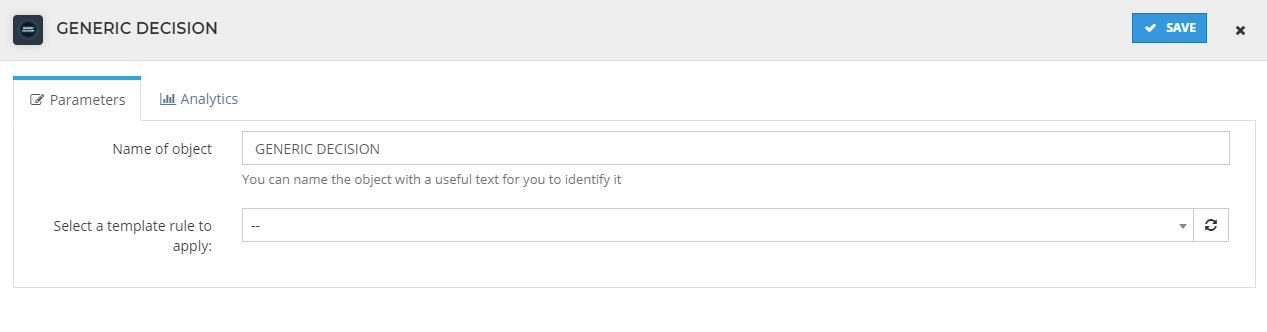
Here we simply select one of the conditions we created here. We can always add more in the conditions overview. This option is very useful if you have to apply the same condition several times in different sections across the system. This is, not only in flows, but also in templates, for example.
Dynamic decision
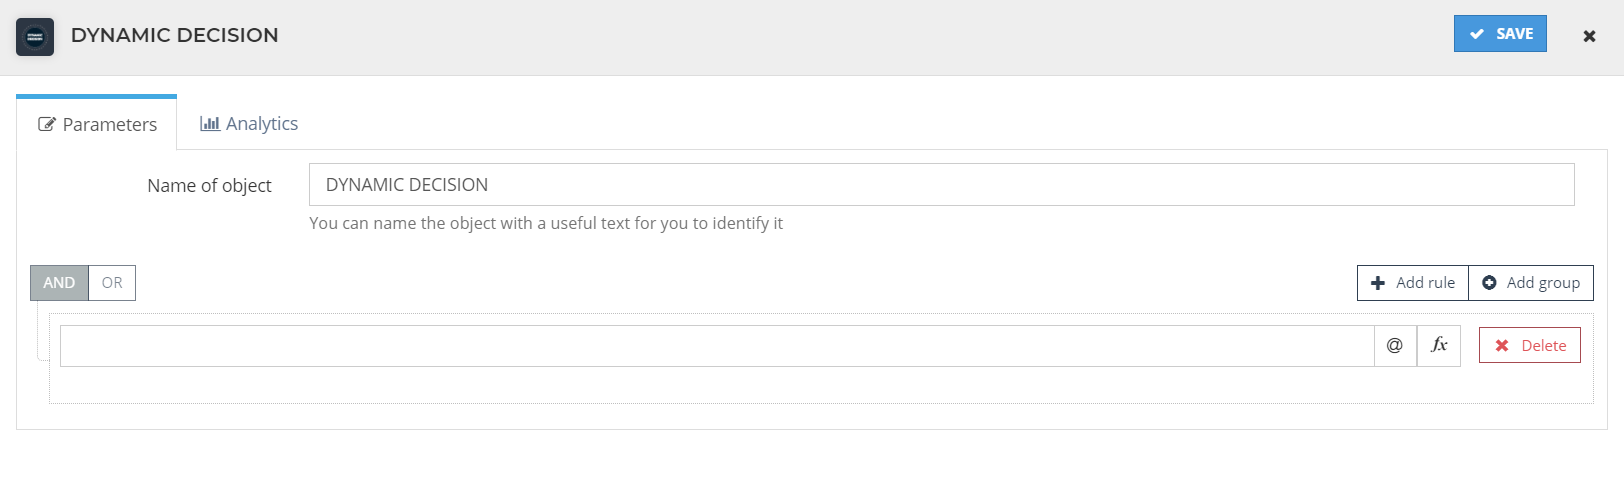
This is the proper option to add if we want to apply a condition just once. We just set the conditions we want to apply for it, save it and link to whatever we wish in our flow.
End
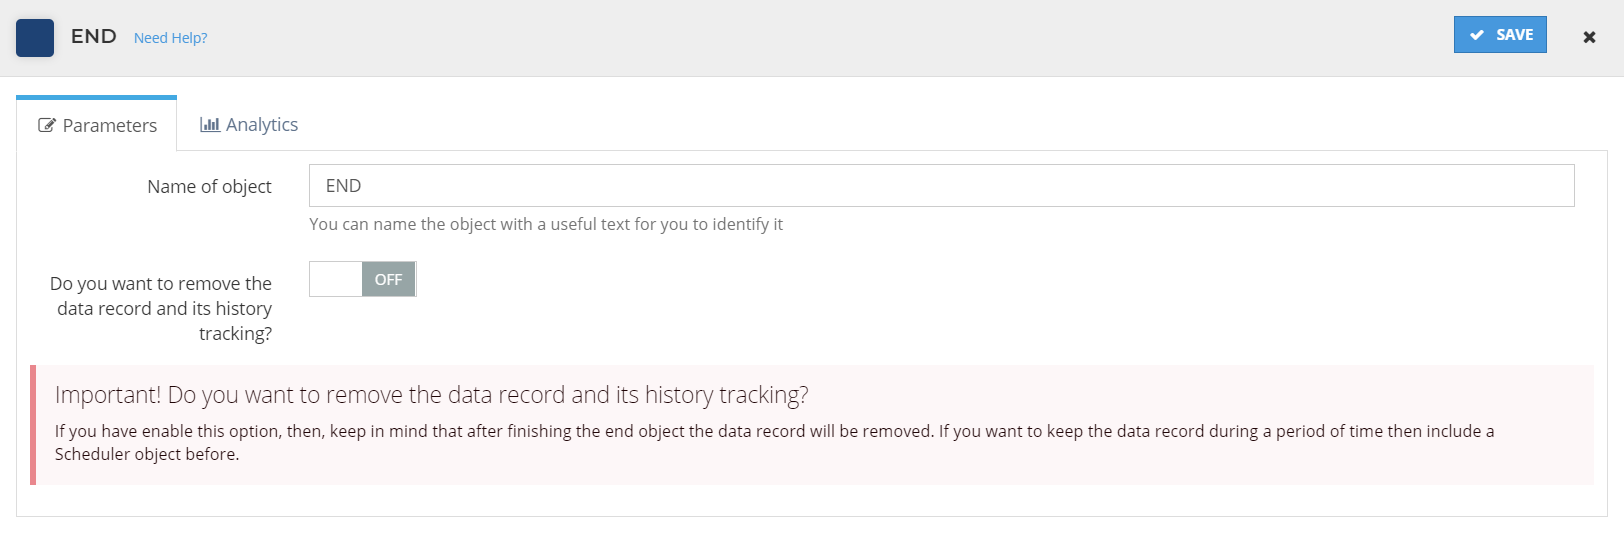
The end object allows us to finish the execution of a data record.
If you place this object within a flow called in a Run a flow, the execution of the parent flow will continue afterwards.
Remove the data record
Optionally, in the configuration of this object, we can enable the option to remove the data record once its execution finishes:
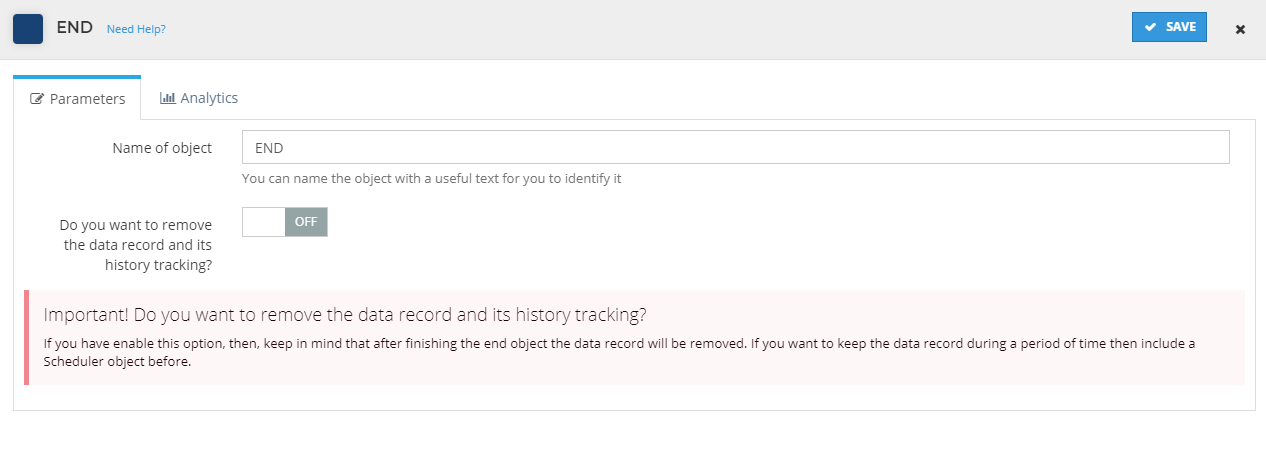
Keep in mind that there is no way to roll back once the data record is removed, so be careful when enabling this option in your flow.
Loop
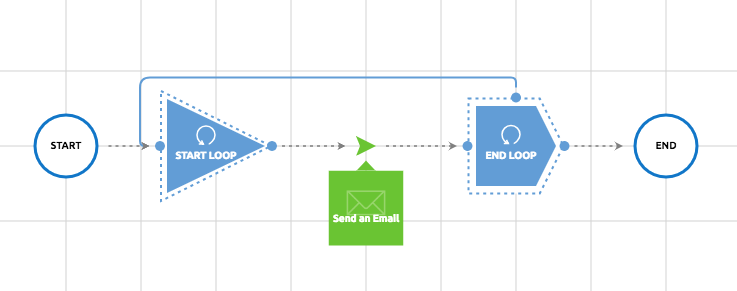
The loop object allows us to iterate through a number of items in the flow.
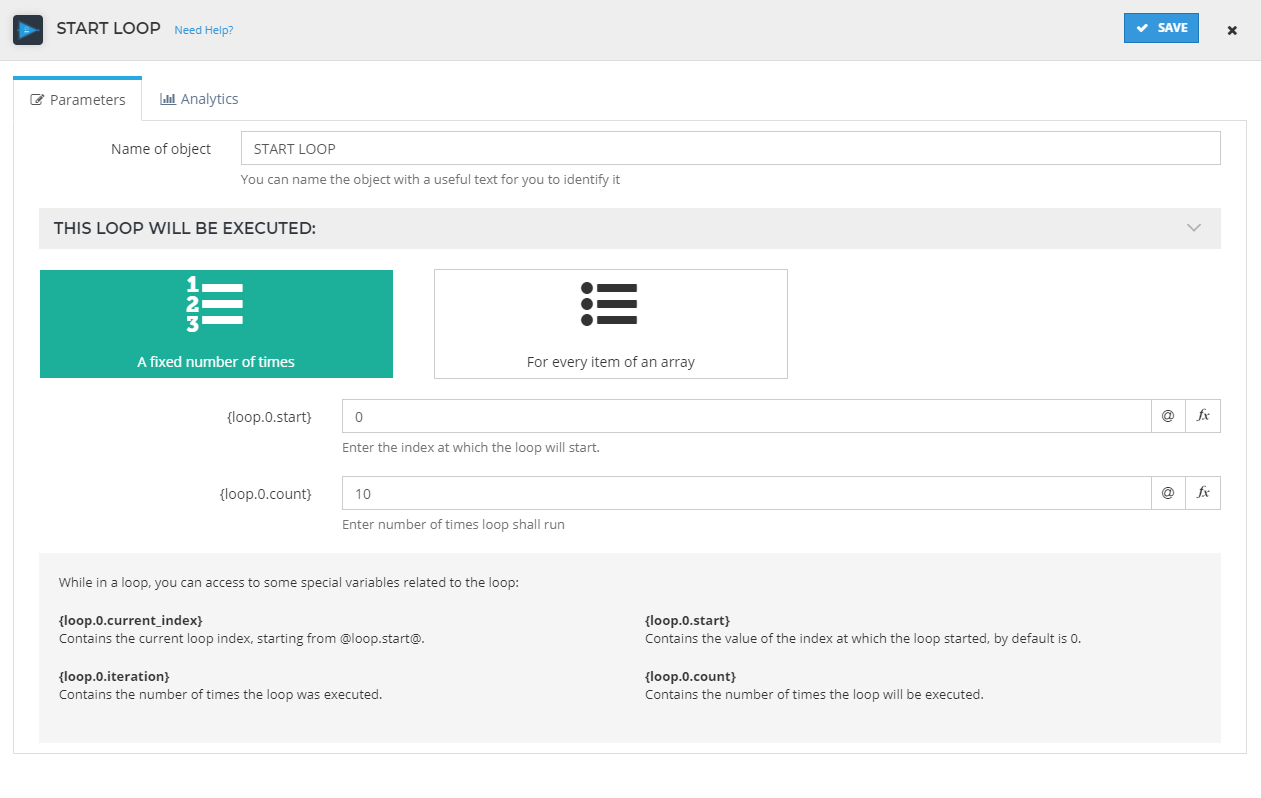
Configuration
In the configuration of this object we have two options available:
A fixed number of times: here we can enter specific start and end indexes. We just set the initial index value and the number of times the loop will iterate. There are some special variables that we can access while looping:
Variable Description {loop.0.current_index}the current loop index {loop.0.iteration}the number of times the loop has been executed {loop.0.start}the value of the index which the loop started at. By default this is 0 {loop.0.count}the number of times the loop will be executed. This cannot be more than 1000 times due to performance restrictions For every item of an array: in this option we have to enter the path of the array that we would like to loop through. In this one we just need to introduce the array path. There are some special variables that we can access while looping:
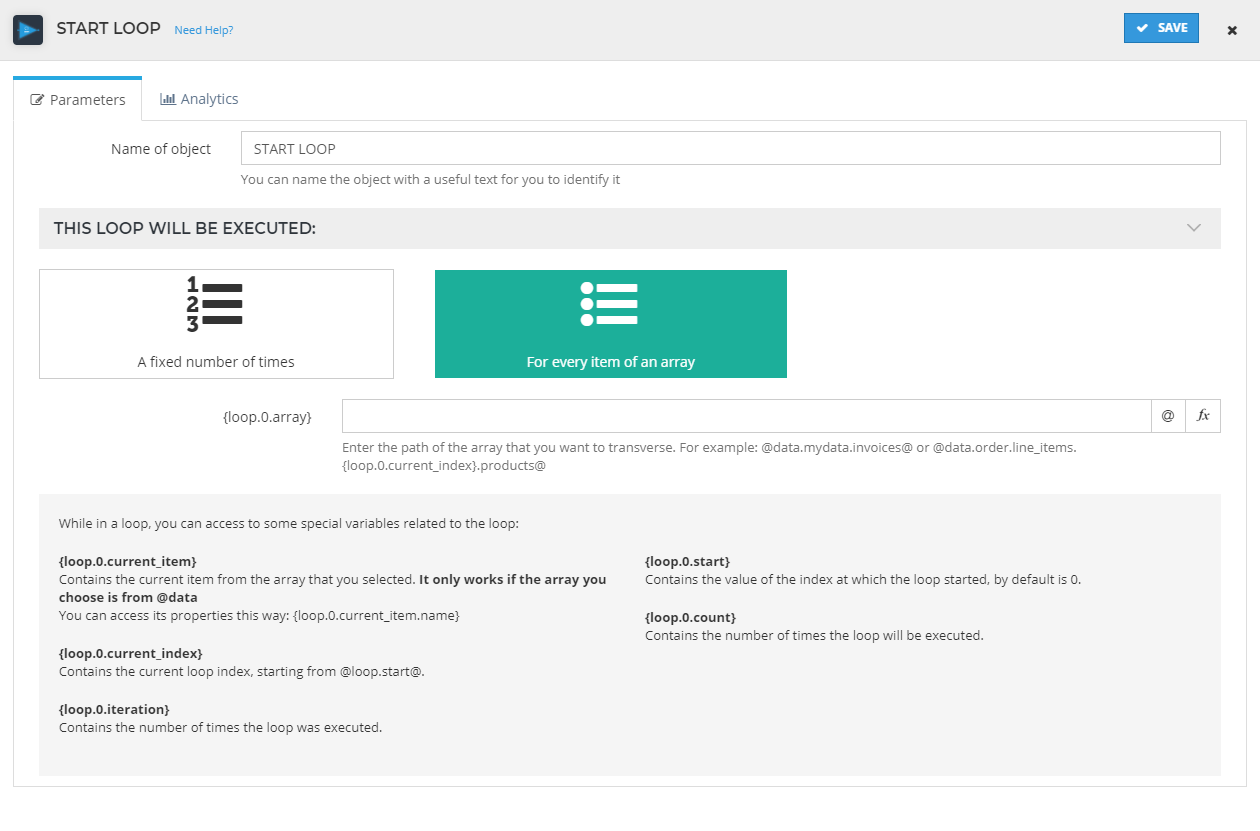
Variable Description {loop.0.current_index}the current loop index {loop.0.current_item}the current item from the array that we entered. We can access its properties as follows: {loop.0.current_item.property_name}{loop.0.iteration}the number of times the loop has been executed {loop.0.start}the value of the index which the loop started at. By default this is 0 {loop.0.count}the number of times the loop will be executed. This cannot be more than 1000 times due to performance restrictions
Move to Flow
With this object we can move our data record to a different flow. It will keep exactly the same UUID and payload.
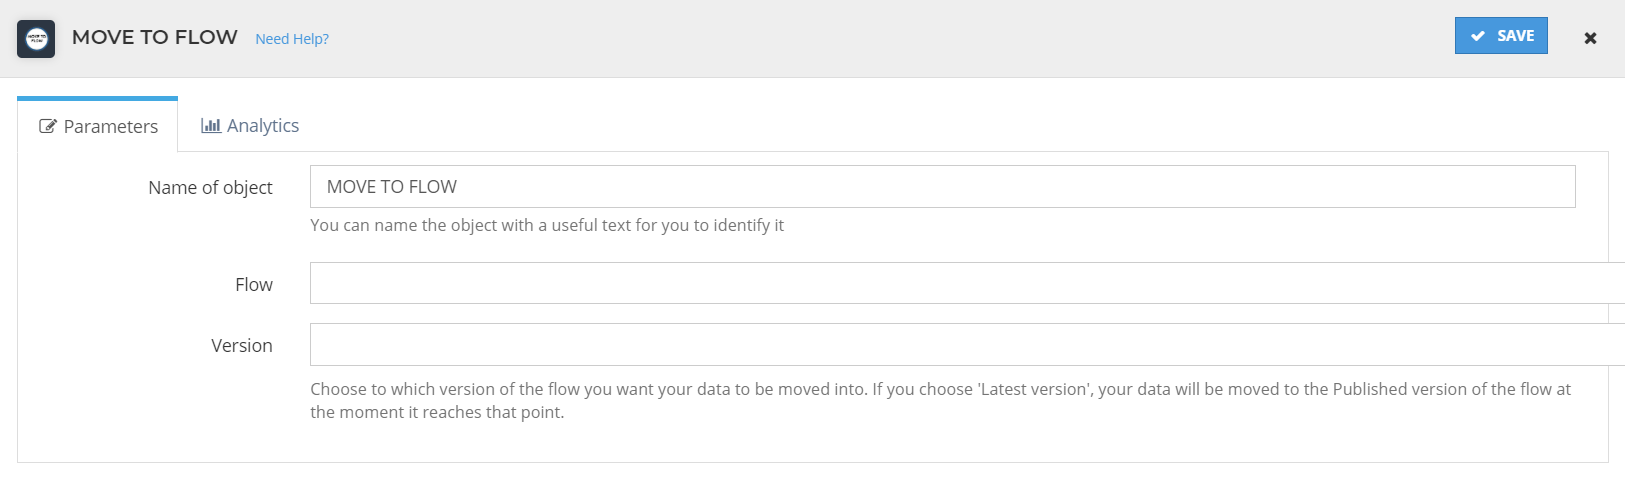
In the configuration of this object we must select the flow which we want to move the data record to and its version.
Run a Flow

As its name says, you can make a call to another flow when getting at this step.
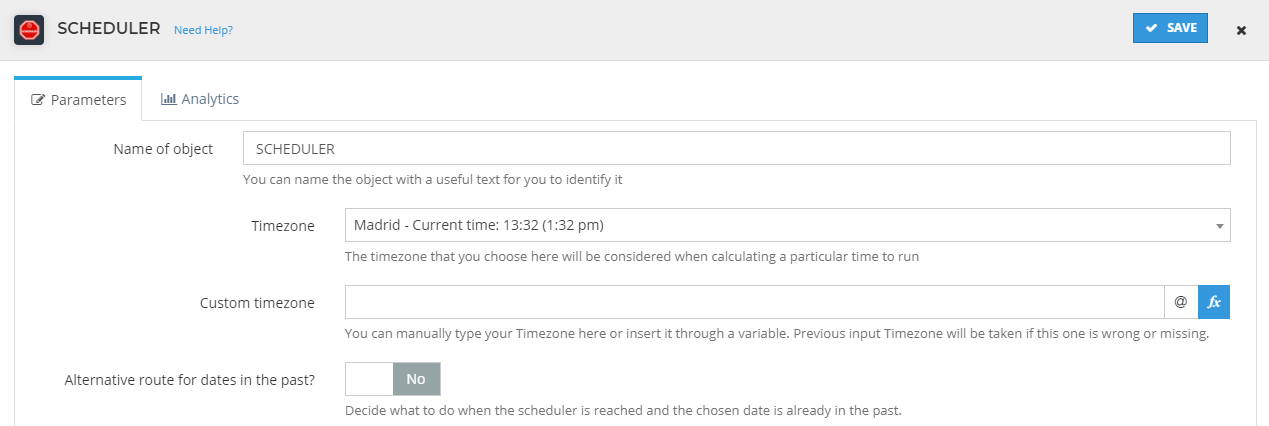
Scheduler app

The Scheduler tool allows you to continue with the execution of a flow at a programmed date/time.
Configuration
In the tool's general config panel you can set a name for it, your timezone, a custom timezone (this one will have priority over the one set above) and an alternative route if the date you enter is in the past.
Besides this, in this same popup, there are three options to choose from, which we will explain below.
Period of time

With this option the tool will stop the flow until a given time after the flow's starting time or the last time the flow was restarted.
Recurrent date and time
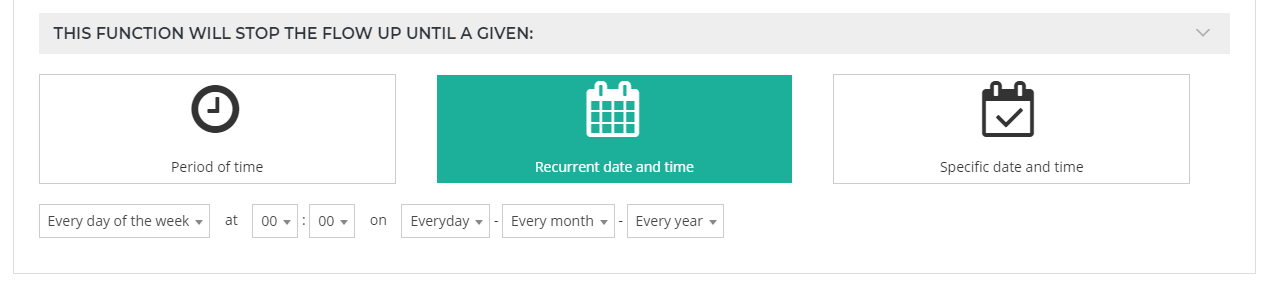
You can choose here between different options for executing this tool repeatedly in certain dates/times.
Specific date and time
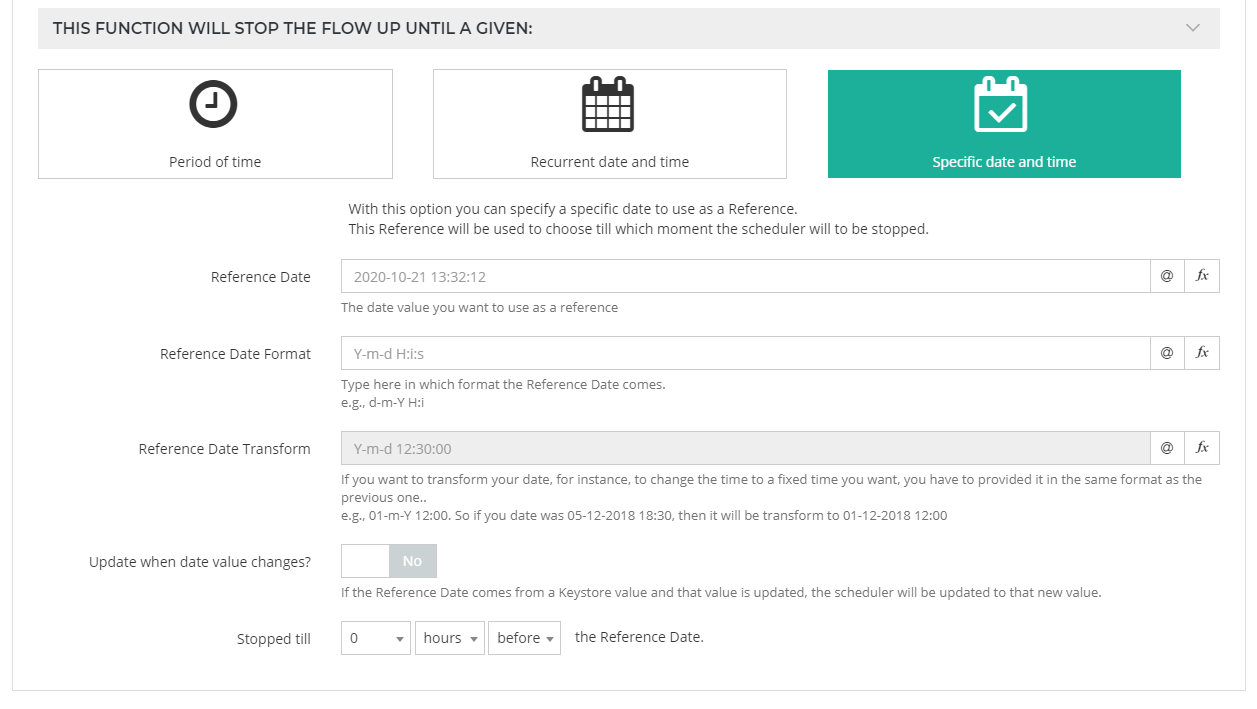
Finally, you can also set a specific period before or after a certain date and time you enter
Bottleneck
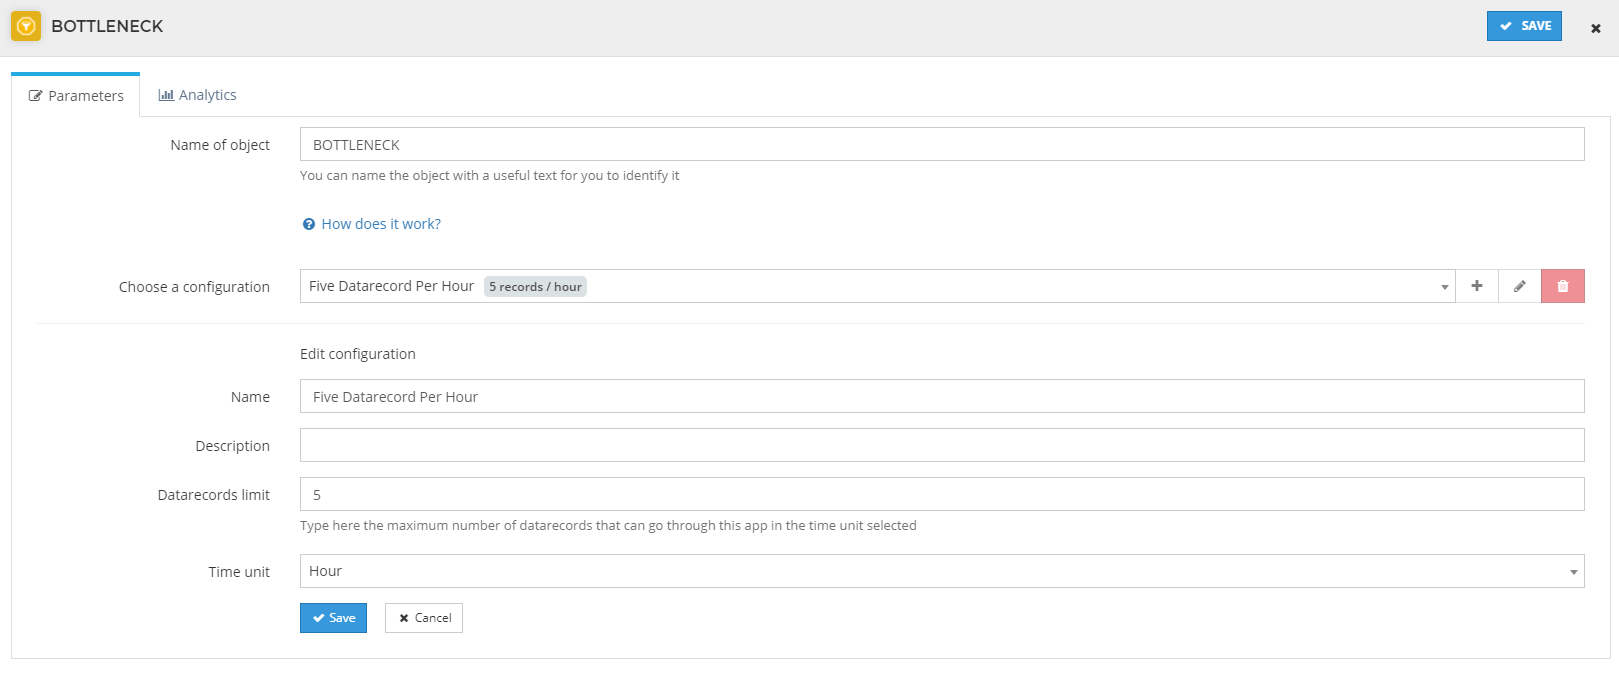
The bottleneck app works like a counter. It counts all the data records passing through it. According to the configuration, It will only let a certain amount of data records pass through it at a specific time.
Configuration :
You can choose how many data records can pass in a minute, hour, or day.
Let's say, you want only 5 data records to pass in an hour. the configuration of the bottleneck will look like this:
To see used cases and examples, click here
Webhooks
When it comes to webhook, bottleneck works similarly as the scheduler.
It's important to point out that if you receive webhooks while the data record is stopped in the bottleneck, they will be processed, and they will move the execution of the data record to the webhook object, moving it away from the bottleneck App.
The "Not permanent" webhooks will be listening while stopped in the bottleneck and once they get to the first scheduler.