Variables
A variable is a result that may take on or assume any given value or set of values.
Variables in our platform follow next structure: @lvl-1.lvl-2.lvl-3@.
For instance:
@data.client.profile_image@
How to use variables
In our platform, a variable is a changeable value defined in the Data Schema and can be modified based on the outcome of an object.
These variables can be entered in various parts of the platform and recognized by the presence of the "@" button for input.
This button will be always next to an input field.
When we click on it, the following pop-up will show up:
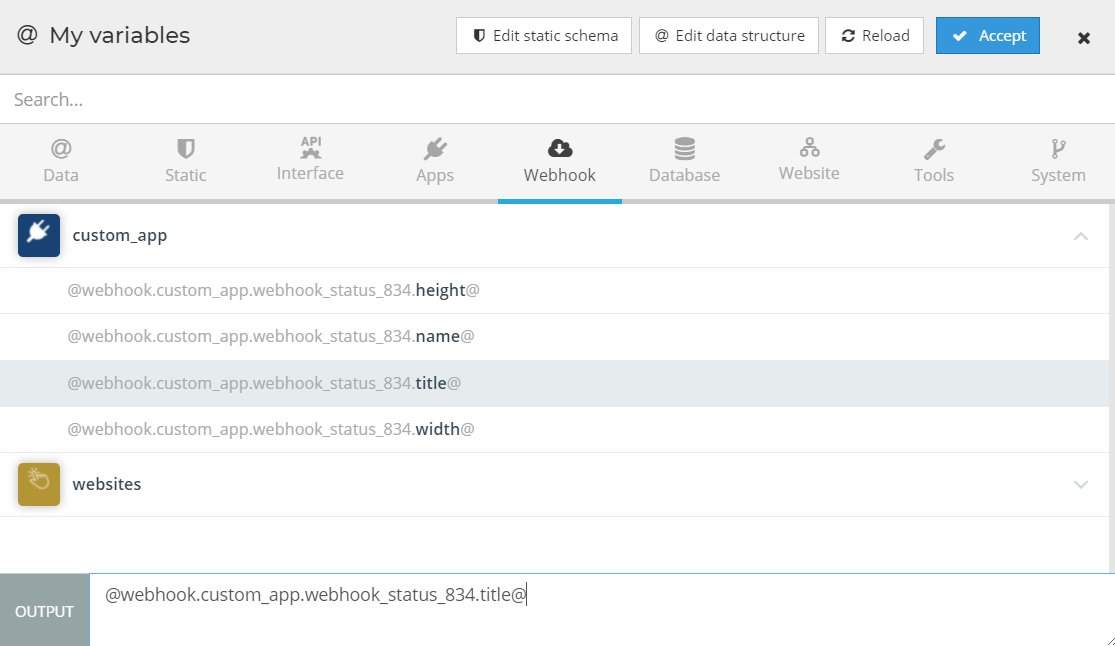
To access variables, navigate to the appropriate category, such as Data, Static, Interface, etc. Once you have selected a category, a list of available variables will be displayed for your use.
Variables Group by Category
The platform organizes variables into categories for ease of use. To make use of these variables, they must first be created. For example, if a variable is created in the Data category, it will be available under that category.
The categories available include:
- Data: All variables from your data scheme.
- Static: All variables from your static data scheme.
- Interfaces: All variables from your interfaces.
- Apps: All variables related to the apps you have installed.
- Webhooks: All variables from your webhook objects.
- Database: All variables from your Database.
- Website: All variables from your Website.
- Tools: All variables related to the tools you have installed.
- System: These are predefined variables provided by our platform.
To use a variable, click on one of the items in the list. The variable will be added to the output. To add multiple variables, repeat the process. Once you have added all necessary variables, click on the “Accept” button and the output will be automatically added to the input field.
Creating variables
All variables are only accessible once they have been created. The following links lead to the resources for the group categories previously listed in the table:
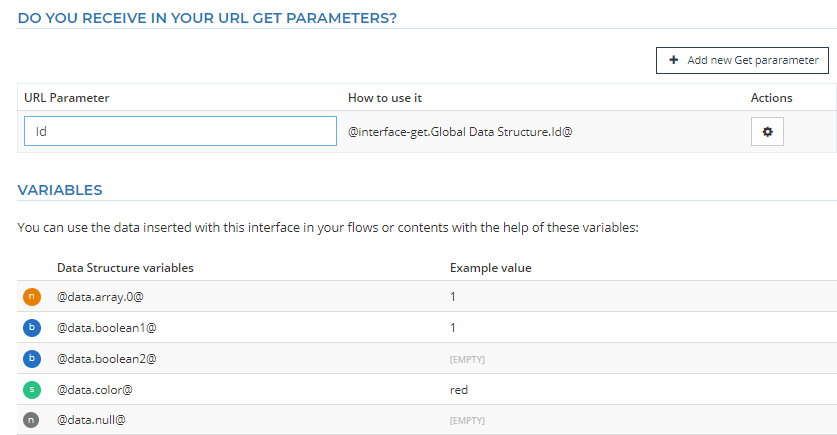
Variables from interfaces
If you have created an Interface, you have access its parameters.
By clicking on the Add new get parameter button you can enter a custom name for the parameter.
Variables from webhooks
If you have set up a Webhooks, you can access the parameters from the Webhook headers and response by storing them as variables in Flowize.
To view these variables, click on "Get Latest Response Variables."
- Webhook header:
@webhook-header.{webhook_id}.{request_header} - Webhook response:
@webhook.{webhook_id}.{response}
If you need additional parameters, you can add them by clicking on "Add new get parameter" and specifying a custom name.
Variables on the database
You can create variables in a database by storing data in tables or keystore data.
Learn more about how to create those Keystore, Tables,
Variables on the website
To add variables to input fields on your website form, follow these steps:
- Go to the website editor
- Click on the input element, within a form, you wish to add a variable to.
- Assign the variable to the input field.
- Then click on the Block configuration tool.
- Write a unique name for the variable.
After saving it, the variable will look like - @yourSite_yourForm_yourCustomName@
and you can use it anywhere in your flow.
System variables
Flowize offers a variety of system variables for your use. To access them, click on the "System variables" button on the right side of the screen. Each variable has a description to help you understand its purpose. Simply select the variable you need and click "Accept" to add it to your flow.