Websites
Create website in Flowize
Creating websites in Flowize is pretty straightforward. You can use existing templates or take all your files necessary for the website, such as HTML, CSS, JS, Images, etc. and make a zip file. You can use the zip file or template to create a website with less effort.
Do not use a page that is loaded by javascript. Flowize website builder will not be able to open that page.
Setting up a project
To start, first, right-click on your organization (top left corner) and click Add Project. If you already have a project, you can open that one too if you want to keep it together.
Then write the name of your website and click Create (top right corner).
The next page will take about 30 seconds to complete everything necessary for the website, such as the database. Once the process is finished, it will notify that project is created.
Start creating a website
Open the project by double-clicking on it. It will take us to the dashboard of your project. To create the website, hover on the Contents (top navbar) and click Websites. Then New Website.
Website configuration
Upload necessary files and select the template file:
Write the website's name and choose the zip file (website or template), then click Upload Zip File (the one we created in the first section).
If you have multiple HTML pages (such as index.html, about.html, contact.html), Flowize will ask you to choose the HTML file that you want to use as a template. In that case, select the main HTML page which you want to display first such as Index.html. Click Continue.
Select page container
You have to choose the Page container from the template. Select the container which will change according to the flow. Such as a form so that we can show them different content once they submit the form.
In simple words, we will use this container to inject different items into the website based on our flow.
You can not select the body element as a page container. You need to select a child of body.
Click on the container in your HTML and you will see a button like # (the picture below). Click on that.

It will ask you Do you want to set this as Page container?, Click yes.
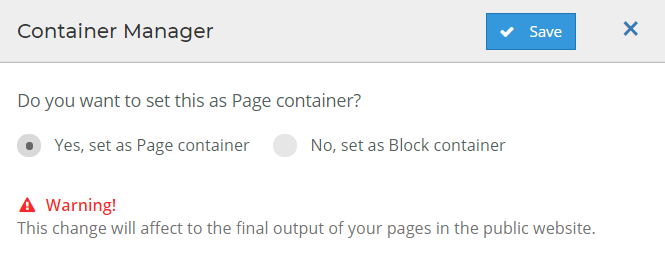
Once you choose the page container, click save (top right corner).
Introduction to tools
Under the main bar you will find this section.
| Name | Icons | Actions |
|---|---|---|
| Website Menu |  | This is the menu for the website. We can create, add, delete pages from this section. |
| Device Type |     | By clicking these button we can view how our website looks on different devices |
| Hidden Items |  | We can toggle between show or hide the hidden items |
| Grid |  | Show or hide grids on the page |
| Fullscreen |  | Click to go to fullscreen mode |
| Preview |  | Preview will open the page in a new tab |
| Redo Undo |   | Undo and Redo. As the words say, they let you go back or forward over the changes you have made |
| Manage Assets |  | Assets management section. you can add or delete or open items for website in this Section |
| Header |  | Change page title here |
| Content Configuration |  | You can configure content here such as names and descriptions |
| Website Blocks |  | Website Block configuration helps us to create layout, add different elements such as tables links buttons and so on. see below section for more details |
| Block Configuration |  | Block Configuration lets us connect with the flows and take actions such as start a flow or send status to the flow. See the below section for more details |
| Styles |  | Style section lets us change styles of HTML elements |
| Layers |  | With this one you will be able to see the structure of your website by layers |
Create block container
Block container is a useful tool. That lets you create blocks in your page. so you can show different content in your page.
With the use of this tool, you do not need to redirect to a new page every time the user is taking an action. you can be on the same page but show different contents depending on user action.
Go to any of your pages and click a container and Click the # (Picture below)
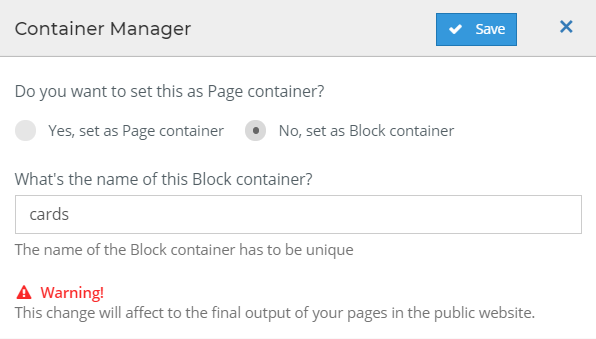
The container manager will pop up and ask you Do you want to set this as Page container?, Click no.
Choose a unique name and click save.
Create a block for block container
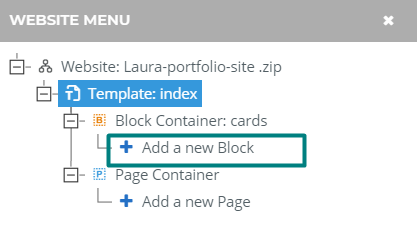
If you click on the website menu( right side) and navigate to the page where you create the block container, you will find the block container that you have created. now create blocks for the container.
Click on the Block container and then click Add a new Block
Customize it and save the page. Use the Load block tool in your flow to show it when needed.
Create reusable blocks
You can create reusable blocks that you can use on many pages. It will help you save a lot of time and not repeating yourself building the same thing twice.
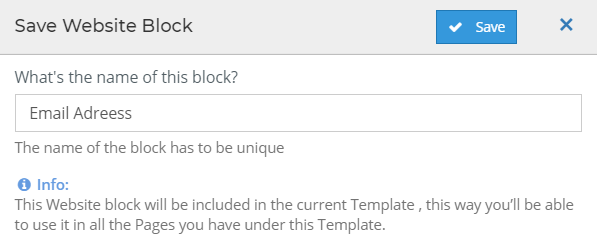
To create one, first click on Website Menu then BLOCK ASSETS MANAGER then choose the HTML from where you want to create a block then click on the Div or Element that you want to save block. That element will show option to save as block (image below).
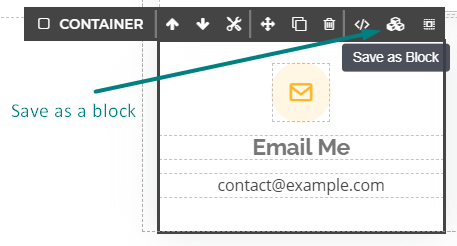
Then you choose a unique name for the block and click save. In future steps you will see how to use it.
Add pages to your website
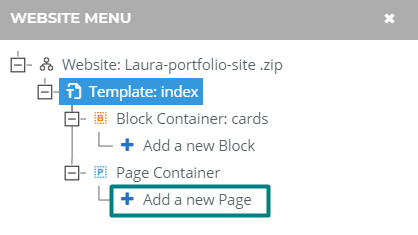
To add pages to your website, you need to click Website Menu then right click Index then click Add Page (like the picture below).
Then you need to configure the page if you want to have unique names. To do that click on Content Configuration and change the Name and Friendly URL.
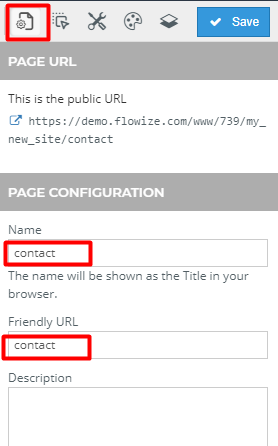
At this point if you save this process you will have a unique name and link for your page which you can visit by clicking the link given under the Content Configuration tool Public URL.
Website Blocks Tool
Website block tool lets us easily customize our pages. This lets you drag and drop elements that you need. The features are :
Layout - This part lets you drag and drop sections, columns, headers and footer. Generally it should be used before anything else to keep things organized.
Typography - This section you will find Links, Text, Heading. You can drag and drop any of these to your website.
Basic- You will get Link button, Link block, Grid items, Style button, Divider. Use according to your needs.
Forms- You can use the ready form to put it in your website.
Tables- You can use tables from here. If you Drag And Drop the table on your website, It will ask you about how many Rows and Columns do you want. Choose and then Click Create Table
Website Blocks (available only if you followed the before) - It lets you use the custom Website Blocks that you created before.
Media- This is used for inserting images and videos.
Block Configuration Tool
This should be used with a Form and Links. You can choose variables for User Input from a form or start a Flow when the user submits a Form using Submit button.
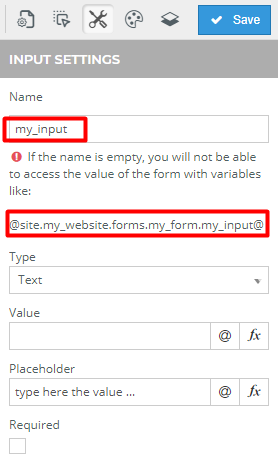
In order to configure the user input, First Click on any From Input Element on your website (picture below).

Then Click the Block Configure Tool to configure the Input Element. Write a name and save it. It will create a Variable for you to use it in your data schema or table or flow. The variable will look like @site...@
You can also Start A Flow from the From Submission. To use it you need to have at least one existing flow.
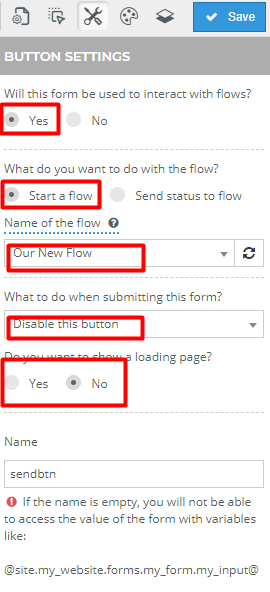
First Click on the button inside the Form

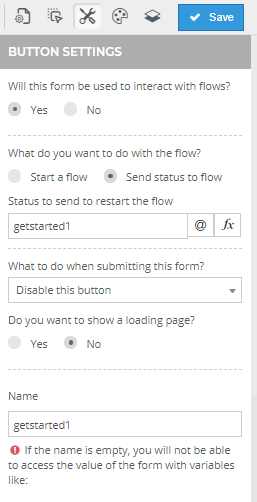
then click the Block Configure Tool to configure the Button element. You need to click on Start a Flow or Send status to the flow Choose the name of the flow from your flow list (picture below). Then decide what you want to do after the user click the button. You can disable it or not disable it. Also choose if you want to show a loading page or not.
 _
_
Styles Tool
To use the Style Tool first you need to select or click an Element on your page then you can configure it according to your needs.
- Classes - This lets you add classes for an element. It is useful when you use external libraries such as Bootstrap.
- Layout - This lets you choose position display properties for an Element.
- Dimension - You can use it to set or adjust height and width of Selected Element.
- Typography - This lets you choose fonts, font size, font color, text align, text decoration, etc
- Indent - You can use it to set or adjust margin and padding of selected Element.
- Background - This lets you choose background color and opacity for an Element
- Border - Just like the word says, It lets you change borders.
- Effects - This lets you add or change transition and transform properties for an Element.
Layers
Layers are different containers and elements in your HTML page. You can re organize them or even hide or show them according to your needs. To move your layers you need to click on Plus Icon and drag the layer up or down. By toggling the Eye Icon you can hide or show the Element.

Learn about website tools to use on the flow-website tool
Websites tools in the flow
You can create websites on Flowize. To manage those websites in the flow, there are tools that you can use. In this section, We will explain those tools.
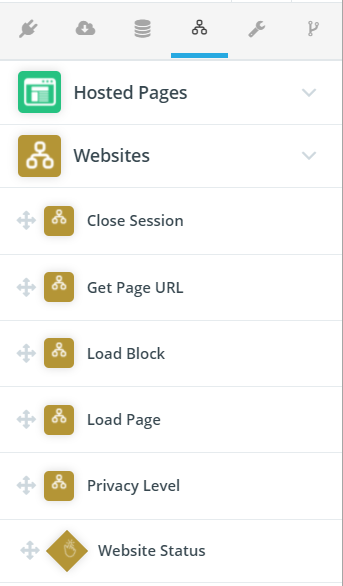
To use the website tools in your flow, first, open your flow, then on the right side, you will find Websites. Click it to open. Then drag and drop the tool to your flow.
| Name | Description |
|---|---|
| Close session | It will end the data record session for the website page rendering. |
| Get page URL | It outputs the URL of the page selected, just in case you need to use it, for example, in an email. |
| Load Block | You can load a block inside your block container without loading the whole page |
| Load Page | It will tell the browser to render the website page selected. You can decide to redirect the browser or to load it in the container selected. |
| Privacy level | If you defined a website page as "private", setting different tags, with this app you will be able to define which of those tags is active. So, if in the page, the tag defined doesn't coincide with the ones set up in the app, the page will redirect to the page selected because you don't have the right to see it. |
| Website status | It behaves similarly to permanent webhooks, which listens to the "Status" sent from the website page. This "Status" can be configured in links and form buttons. |
Close session tool
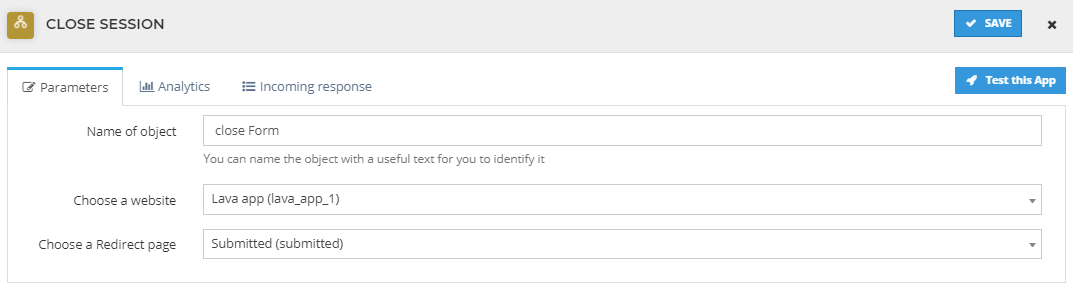
Now let's take a look at the close session tool.
To use it, Drag and Drop in it the flow. Then double click to configure. Write the name, Choose the website that you want to close, and choose a redirect is the page you want to show once the session is closed. Click save to save the configuration.
Get page URL
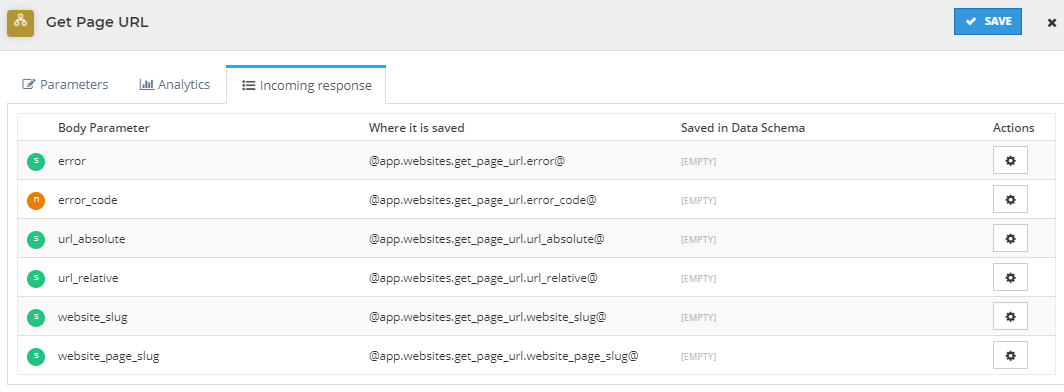
Now let's take a look at the Get page URL tool.
To use it, Drag and Drop in it the flow. Then double click to configure. Write the name of the object. Choose the website and page where you want to take the Url from.
To use the URL, you need to take the incoming Response Variable from this tool and use it in the following application.
Load block
You can load a block inside your block container without loading the whole page. This is faster than loading a whole page.
To use it, drag and drop it in the flow. Then double click to configure.
Write the name of the object. Choose the website where you created the block.
Choose a Block container Select the block container from the drop down.
Choose a Block Choose the block what you want to load.
Load page
Just as the word says - this tool lets us load a different page using the flow.
To use it, Drag and Drop it in the flow. Then double click to configure.
Write the name of the object. Choose the website and page that you want to load.
How to load the page? You have two options for this:
Redirect the user to the new page: This option will redirect a new page by loading a new page. Choose the page and click save.
Inside a container in the current page: This option lets you put the page inside the main container of the page. Choose the container where you want to load the page and click save.
To learn more about how to create the main container- here
Custom domain If you have a custom domain, you can add it here.When using the website in your own environment and you have uploaded an SSL certificate to use your own domain, you need to put here the domain so the URLs of this App will have it.
Privacy level
You can adjust the privacy of your page using this tool. If you use it, your page will be private, which means only selective people can see it.
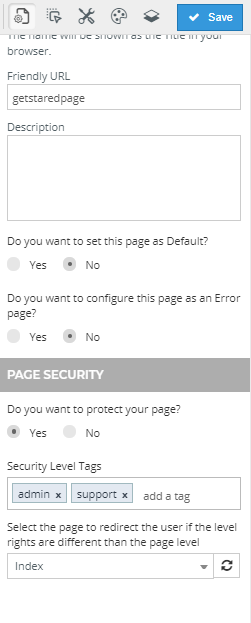
Before you start using this, you need to create tags on the website, and to do this -we need to configure it at the content > website > link or button inside the form > Content configure tool > Scroll down and choose -Page security (yes) > Add Security Level Tags (such as admin)> Also select which page you want to show to a visitor who does not have the tags (Picture below)
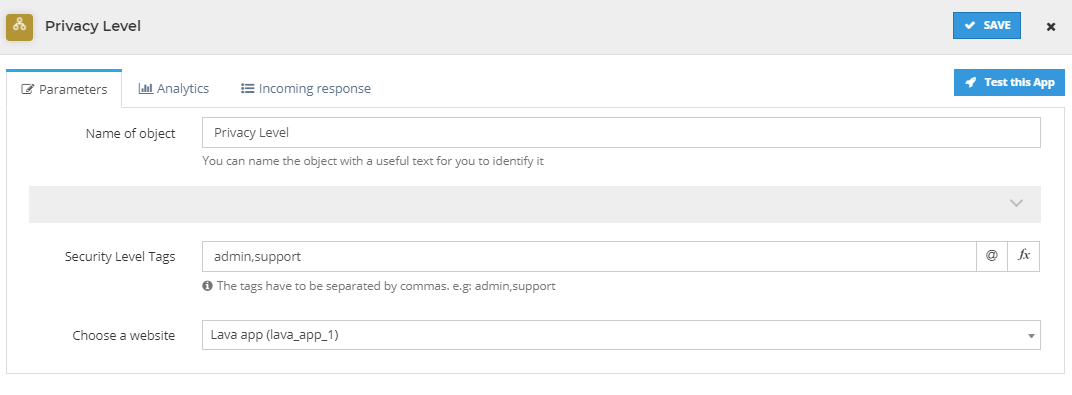
Then, drag and drop and then double click to configure the tool.
Then add the security Level Tags: add those tags that we created on the website. With this tag, you will be able to define which of those tags is active. Only visitors with tags can be able to see it.
Choose a website: Choose the website that you want to make private.
Website status
This tool lets us listen to user's interactions from the website. Suppose when the user clicks a button or clicks a link inside the form.
In order to listen to the user's interactions with a form. we need to configure it at the content > website > link or button inside the form > Block configure tool > Choose -Send status to the flow (Picture below)
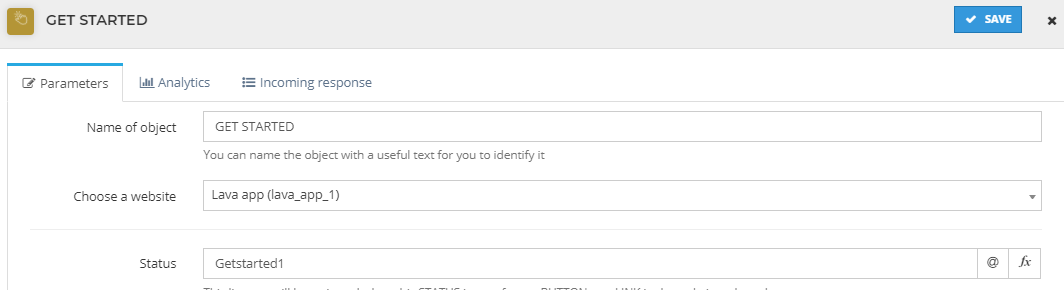
Once you are done with this, you can customize the Website status like the picture below. Make sure to write the name of the status precisely the way you configured the in the website section.
Website Events
This section has nothing to do with flowize website builder. It's just for Web Developers to customize their events on the website.
This post will help programmers write the source code for the website that you want to use in flowize.
JavaScript events for Flowize website.
Using these codes will trigger a few different events when different actions are taken using the component, allowing you to add custom behavior and perform actions.
| Event | Description |
|---|---|
fw:page:loaded | To Call when page is loaded by AJAX in container use |
fw:page:redirect | Called just before the page is redirected |
fw:block:loaded | To Call when a block is loaded by AJAX in container |
fw:form:submitted | Called before the form is submitted or the button submit is clicked |
fw:form:success | Called when the form is submission is success |
fw:form:error | Called when the form is submission is error |
fw:form:complete | Called when the form is submission is complete, doesn't matter if is success or error |
fw:button:disabled | Called when the button is disabled |
fw:link:clicked | Called when the link is clicked |
fw:link:disabled | Called when the link is disabled |
Page events
With Pages Events, you can define a page behavior such, as when a page is loaded or before the page is redirected. Example:
Page loaded
This event is called when page is loaded by AJAX in the container.
$(document).on('fw:page:loaded', function() {
    //Your code goes here
});
This event also sends data. If you want to access the data, use the code below-
$(document).on('fw:page:loaded', function(ev) {
    // your code goes here
    // The event can have this information
    // ev.detail.id => That's the page ID
    // ev.detail.name => That's the page name
});
Page redirected
This event is called just before the page is redirected.
$(document).on('fw:page:redirect', function() {
    // your code goes here
});
Loading block event
This event is called when a block is loaded by AJAX in the container. This event also sends data. If you want to access the data, use the code below-
$(document).on('fw:block:loaded', function(ev) {
    // your code goes here
    // The event can have this information
    // ev.detail.id => That's the block ID
    // ev.detail.name => That's the block name
    // ev.detail.container_name => That's the container where the block has been loaded
});
Form events
With form events, you can define what to do when a form is submitted, form submission is a success, form submission is an error, form is submission is complete. Let's take a look at examples.
Form submitted
This event is called before the form is submitted, or the button submit is clicked.
$('form').on('fw:form:submitted', function() {
    // your code goes here
});
Form submission success
This event is called when the form is submission is success.
$('form').on('fw:form:success', function() {
    // your code goes here
});
Form submission error
This event is called when there is a form submission error.
$('form').on('fw:form:error', function() {
    // your code goes here
});
Form submission completed
This event is called when the form is submission is complete, doesn't matter if is success or error
$('form').on('fw:form:complete', function() {
    // your code goes here
});
Button event
This event is called when the button is disabled.
$('button').on('fw:button:disabled', function() {
     // your code goes here
});
Linked event
With Link events, you can define what to do when a link is clicked or disabled.
Link clicked
This event is called when the link is clicked.
$('a').on('fw:link:clicked', function() {
    // your code goes here
});
Link disabled
This event is called when the link is disabled.
$('a').on('fw:link:disabled', function() {
    // your code goes here
});