URLs
Introduction to URL
There are four types of URL options in Flowize
To use it, hover over Triggers, Then click on URL. If you have existing URLs, you will see them here.
To create one, Click on New URL. You will be redirected to a new page. You will be asked to choose between Direct URL, Sync URL, Hosted URL, Dynamic URL.
Let's take a look at those in the table below.
| Name | Description |
|---|---|
| Direct URL | Send records to the API by simply performing a post to a certain URL. |
| Sync URL | Send records to the API with synchronous and customize response. |
| Hosted URL | Insert a data record based on a form submission from a Hosted Page. |
| Dynamic URL | Insert records or webhooks depending if a certain ID has been already inserted |
Direct URLs
To create one, hover over Triggers, Then click on URL, then Click on New URL(Top Right Corner). You will be redirected to a new page. You will be asked to choose between Direct URL, Sync URL, Hosted URL, Dynamic URL. Choose Direct URL.
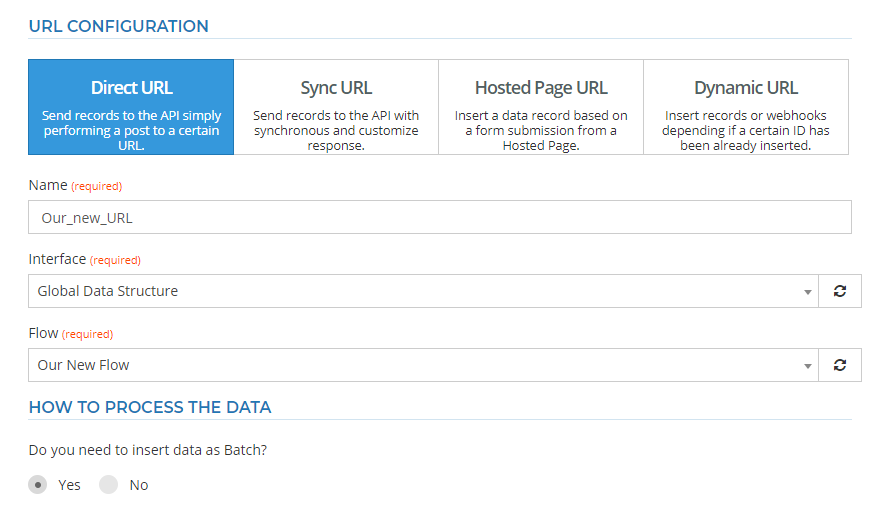
Direct URL's Parameters
The following parameters must be specified for each type of direct url:
Name: the name of our direct url.
Interface: this defines the payload that our direct url will receive.
Flow: this is the flow that will be triggered by our direct url.
How to process the data: If you are going to send a batch of records,
you need to Choose Yes.
Priority: Defines the priority in which the data records will be executed. By default is 50, and you can put a number from 100 (lowest) to 0 (highest).
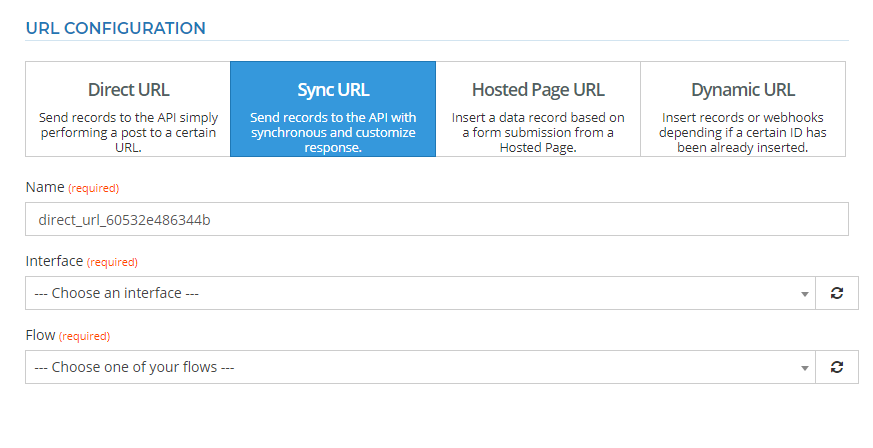
Sync URL
The Sync URL is a way to insert data into our system and receive synchronous response. The synchronous response will be received when the workflow stops in the following cases:
- Reaching the first Stop, Run a flow, Move to flow or End object.
- When the workflow has finished with an error status, the API will send back the response.
The Sync URL has a particular app that we can use inside the workflow to get back a custom response depending on some decisions made before. Later on, we will explain on detail how it works.
Create a Sync URL
To start setting a Sync URL, we need to click on the “Triggers” menu inside your project and start creating a new URL.This option allows you to insert new data records into the system with the only difference with a Direct URL that we will receive the synchronous response.
Once we are in the creation view, we will need to select the second option "Sync URL" and start setting up the workflow target where we are going to insert new leads or records and the interface needed. After clicking on the "Save" button, our Sync URL will be ready to be used.
The following parameters must be specified to create a new Sync URL:
| Parameter | Description |
|---|---|
| Name | The name of our Sync URL |
| Interface | This parameter defines the payload that our Sync URL will receive |
| Flow | This parameter is the flow that will be triggered by our Sync URL |
Synchronous custom response
On this tab, we are going to prepare a Global response if the workflow is stopped in one of the following points:
- Reaching the first Stop, Run a flow, Move to flow or End object.
- When the workflow has finished with an error status, the API will send back the response.
When you are configuring the Synchronous response, you need to keep in mind which are the headers and the success and the error payload you need to receive through the API Server.
“The request format is only a helper to colourize the editor depending on the payload format selected. Right now is supported JSON, XML and Raw but the important thing that you can define your custom payload, and it will be returning it with all variables replaced.”
Sync URL App
The Sync URL has an App that allows you to customize your synchronous response within a workflow. If the workflow contains this App before stopping at one of the above points commented then it will return the settings you previouly created on this App. To start using the App:
- You need to install it from the project menu “Apps” and then select the option Tools.
- In the Tools overview looks for “Sync URL Response” if it is not visible in the main view.
- Once it is installed, we will find a new App in our workflow palette ready to be used.
- After dragging the App to the workflow, we can configure different responses depending on the decision output.
- To configure the App, we need to do a double click on the workflow object in our above example, you can set the “Success answer” or “error answer” object.
Above is shown a list of parameters that we can configure in the same way as we configured for the Global response of the Sync URL.
Hosted Page URL
This option basically renders a hosted page content that will kick off a flow.
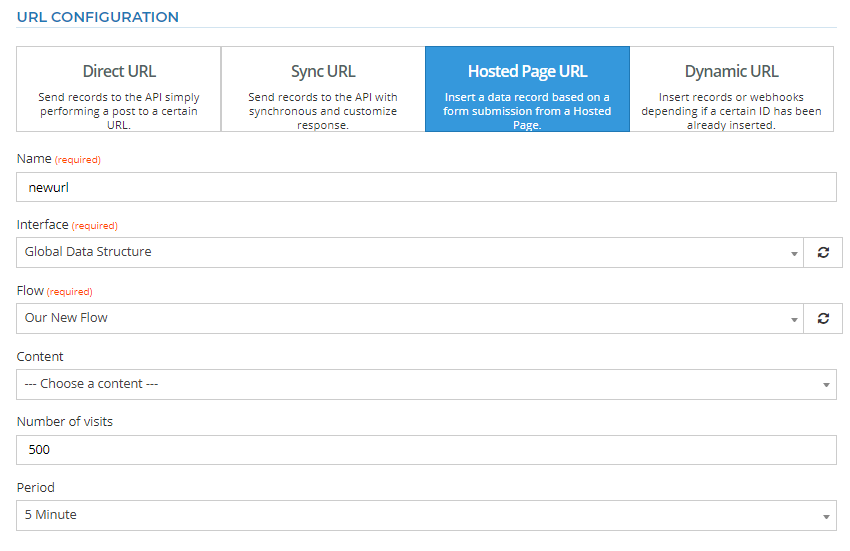
Hosted Page URL's parameters
The following parameters must be specified for each type of direct url:
Name: the name of our direct url.
Interface: this defines the payload that our direct url will receive.
Flow: this is the flow that will be triggered by our direct url.
Content: Your hosted page content
Number of Visits: set the maximum number of visits to this page allowed by a period of time.
Period: Time to execute
Please remember that your content won’t be available until you publish it.
Dynamic URL
A dynamic url will always insert a webhook response into the system. Moreover, if there is no active record for the selected flow, it will also insert one.
Dynamic URL creation
To Create one. Hover over Triggers,then click URLs -> New URL -> Dynamic URL. And fill up the inputs:
| Parameter | Description |
|---|---|
| Name | The name of our Sync URL |
| Interface | This parameter defines the payload that our Sync URL will receive |
| Flow | This parameter is the flow that will be triggered by our Sync URL |
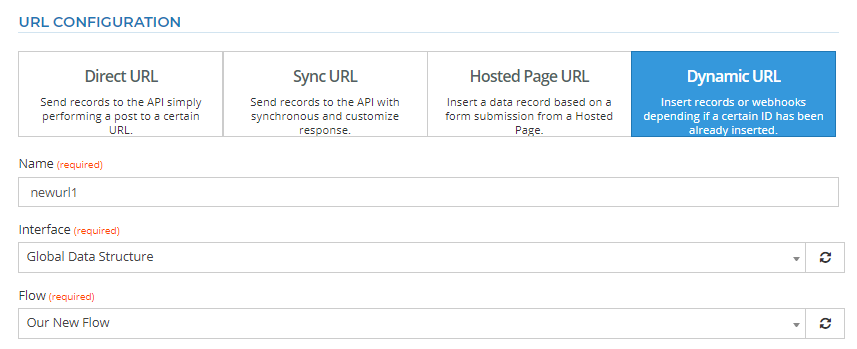
Then click Save.
Setup Webhook for dynamic URL
If you saved the previous Step,you will be re-directed to a new page. Then you need to configure the SETUP WEBHOOKS
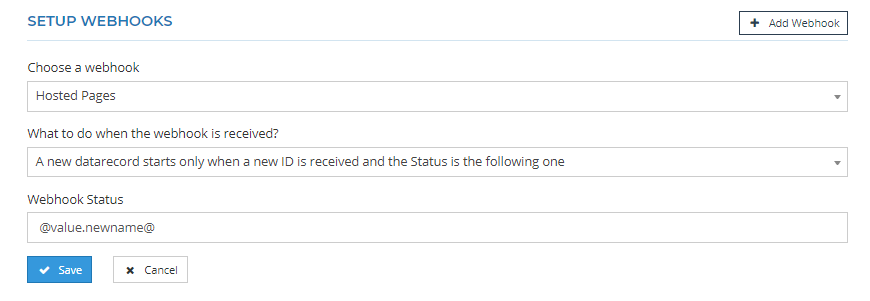
this will start a flow when status matches a string: this will only perform its action when the status key sent matches a given string.
Finishing
Regardless of the type we choose, the system will generate our url that will be displayed at the top of the page once you save it.