ODBC Connector
As of September 26th 2023, the ODBC Connector functionality described in this document is officially deprecated and will no longer be available for new projects. Please note that we will cease providing support for this feature. Existing projects using ODBC Connectors can continue to operate as usual, but we encourage transitioning to alternative solutions as soon as possible to ensure ongoing compatibility and support. For more information on alternative solutions or guidance on transitioning, please contact our support team.
An ODBC Connector is a way of retrieving data from external systems and send it to another system. That data can be used in our system, for example, to trigger a Webhook to enrich your data record or send it to a direct URL to start executing a flow. To be able to use ODBC Connectors, you will need to install a Gateway Service software (GSA) in the external server, so it can communicate with our system.
Here you can preview a schema of how the system works.
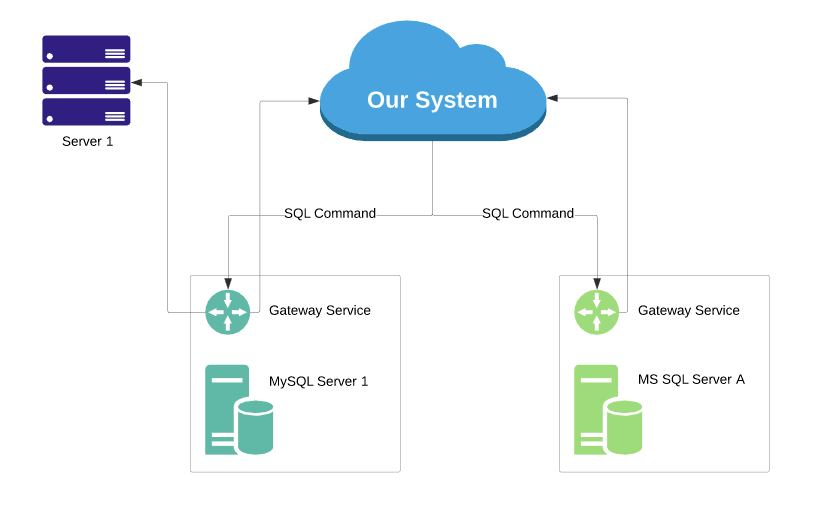
- Configure an ODBC Connector connection in our system.
- Set up the ODBC Connector Commands that will be executed in that ODBC Connector Connection.
- Set up the Gateway Service App (GSA) in your server so, it can start receiving commands from our system.
- Every X seconds (refresh interval configured in the App) the GSA will send a request to our system to receive the
command that it needs to execute.
- It will only receive one command in status
READYper request. - It will change the command status to
PROCESSING.
- It will only receive one command in status
- Once the GSA has finished executing the command provided:
- The GSA will send a request to our system to let it know it has finished executing the command.
- If the command was
STATIC, it will put its status back toREADYand, it will calculate the next execution time based in the command configuration. - If the command was
DYNAMIC, it will be set asFINISHEDand archived, so you can review it later on. - If there is any error executing the command, we will see a red sign in the Commands overview.
- The data gathered by the command will be sent to the Callback URL configured in the command.
- The process continues while the GSA is ON, sending requests to our system.
ODBC Connector Connection Setup
The first thing you need in order to use ODBC Connectors in our system is to create an ODBC Connector Connection. You only need to provide a name, and a connection will be created.
Go to the “ODBC Connector” section, and you will see a screen like this if you already have a connection created.

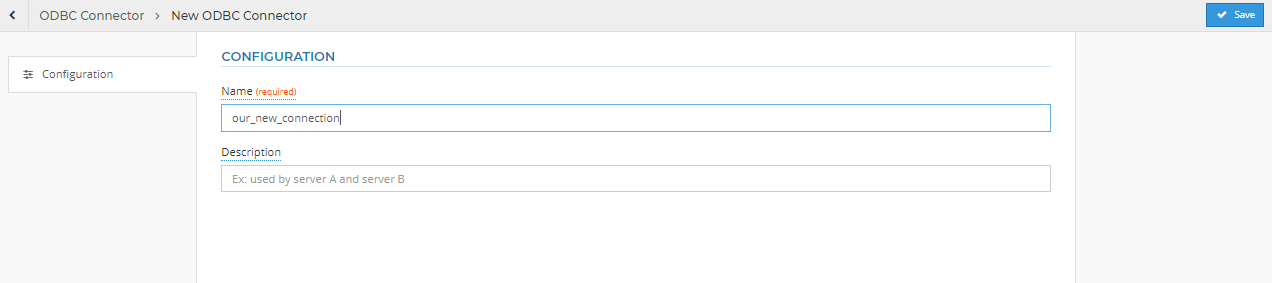
If you do not have any existing connection, just click the “New ODBC Connector” button, and a new page will load. Just fill in the ODBC Connector connection name. The name can only contain characters in lower case [a-z], numbers [0-9] or the symbol ‘_’. If you want to give a description to your connection to detail the purpose of it, fill in the “Description” but that field is not mandatory. Click save.
After saving the connection, you will be redirected to a new page where the API key information is. You will need this data for setting up the Gateway Service App (GSA).
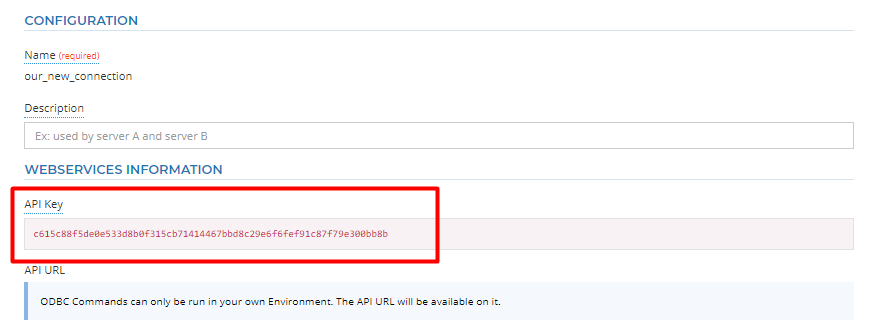
API URL is only available on the production environment.
Now, if you go back to the ODBC Connector page, you will see your new connection.
Let's talk about the actions on this page. Click the Action button on the right of the connection.
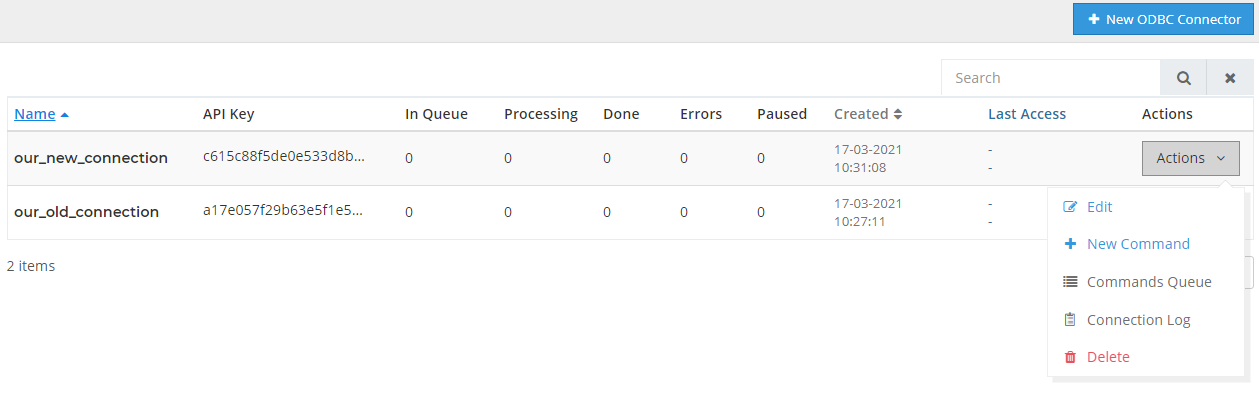
New Command This action will direct you to the creation page of a Static ODBC Connector Command.
Commands Queue Here, you will see which ODBC Connector Commands are configured, which are being processed, etc. It’s the place to go to have an overview of what is happening in this connection.
Connection log The request done by the Gateway Service App are all logged and can be viewed in this option. You can find the time and the IP which did a request to our system using this ODBC Connector connection. You have the option to “Delete all logs” from that connection.
Delete This option will DELETE the ODBC Connector connection with all the logs and commands. You will need to enter your password before deleting it, as the data will be UNRECOVERABLE. Use it with care.
ODBC Connector Commands
After defining the connection, you need to define the commands that are going to be run in that connection. Commands cannot be shared between connections. Each ODBC Connector Connection has its own commands.
You can create two types of commands, Static, and Dynamic. We will take a look at these two commands and how to create them.
Static ODBC Command Configuration
What does STATIC mean? It means that this command will be sent to the ODBC Service App periodically to retrieve data. This command will be executed till you delete or pause it.
When the command is created through the “New Command,” it is always created as STATIC.
Let’s start configuring the command. Click ODBC connector, and you will find your connections (or the one we created in the previous section). Click the Action then click the New Command .You will be prompted with a screen link this: (description for each field is given below)
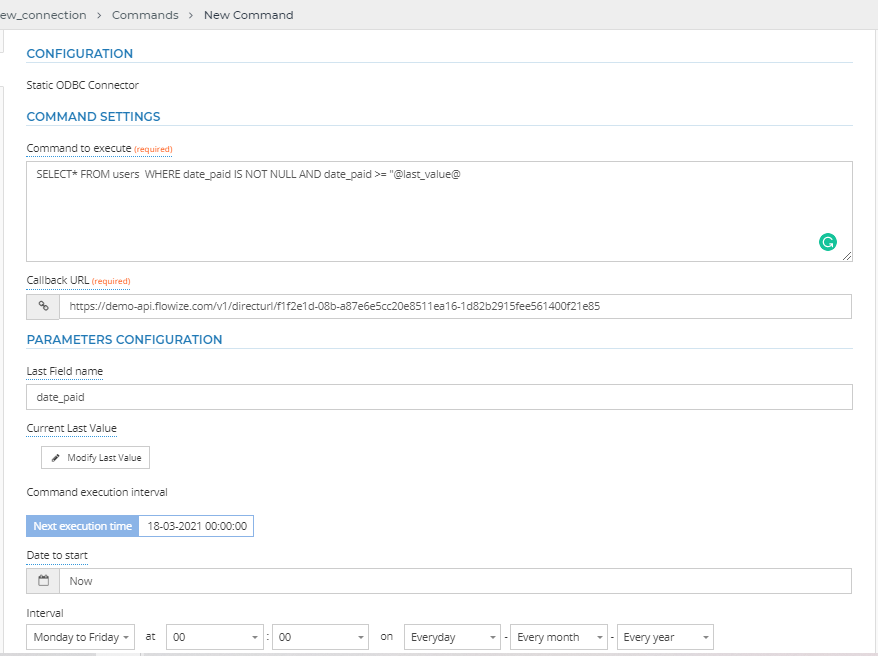
Command to execute
In this place, you can type the actual command that you want to be executed in your server. You can paste here any command that you want to execute: SELECT, INSERT, UPDATE, DELETE, DROP … Whatever you want to be executed in your database. There is no restriction in what can be typed, so use it with care.
There is a special variable, @last_value@, that you can use in your command in order to obtain newer data from the command if you need it. This variable is explained later when configuring the “Last Field Name”.
Callback URL
Type a URL or choose from one of the URLs that you already have configured in Flowize like a direct URL. In this URL you will receive the data in JSON.
Last Field Name
Type here the name of the column in your database table that holds something that can be uniquely identified. This field will help to retrieve updates of data from your system.
Let’s put an example as it will be easier understandable.
Let’s say you have in your database system a table that holds invoices information and has these columns:
“id”, “date_created”, “date_paid”, “customer_id”, “amount”.
Every day you execute one command that
is “SELECT * FROM invoices WHERE date_paid IS NOT NULL AND date_paid >= "@last_value@” and in the “Last Field Name”
you put “date_paid”
This command will be executed, and the Gateway Service App (GSA) will send to our system the last value of the column “date_paid” so we can store it, for example “2019-06-01”. This way, next time the command is sent to the GSA, it will take into account that value so only the invoices paid from 2019-06-01 till now will we retrieved.
This is the actual @last_value@ received from the GSA, and it will be sent when the
command is sent again to the GSA. You can modify it by clicking in the button.
Scheduler
With the scheduler, you can configure the time interval in which the command will be executed.
In the blue box, you can preview at what time this command is going to be sent to the GSA to be processed. With that configuration, the command will run from Monday to Friday at 10:00 in the morning.
Dynamic ODBC Connector Command
It’s a command that it’s meant to run only once, for example, to gather data and send it to a webhook to enrich some data that we are already executing. A Dynamic command can only be created when the flow is in execution, and we have placed the ODBC Connector App in the flow.
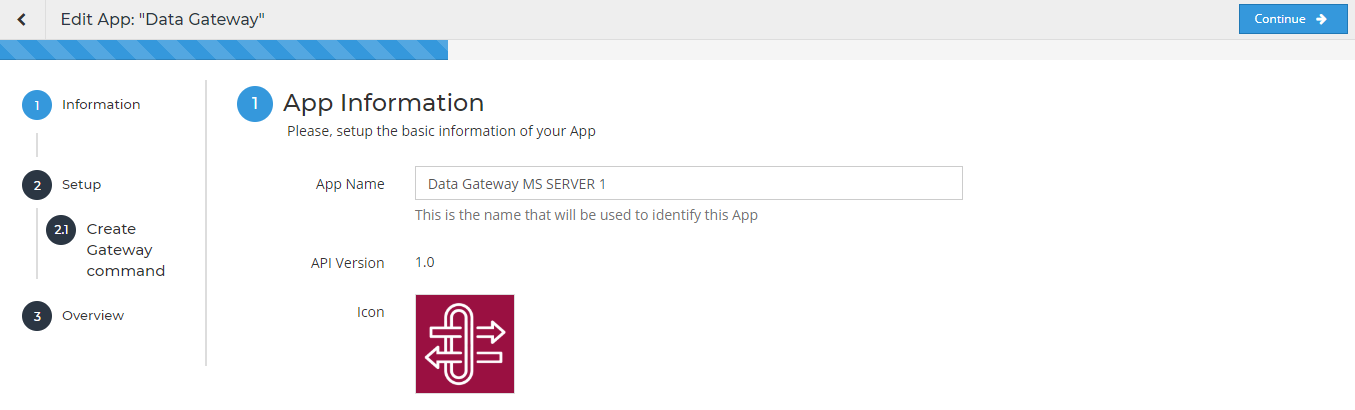
Creating a Dynamic ODBC command involves creating a flow and configuring an App. When you create an ODBC Connection, a new App is created in your Tools called "Data Gateway".
Before using it in a flow, we need to configure it, so go to “Apps” -> “Tools”, and you will find it there. There will be one Data Gateway App per connection that you have created. Let’s change the name of the App to something we can easily identify with our connection.
Now let’s configure the command
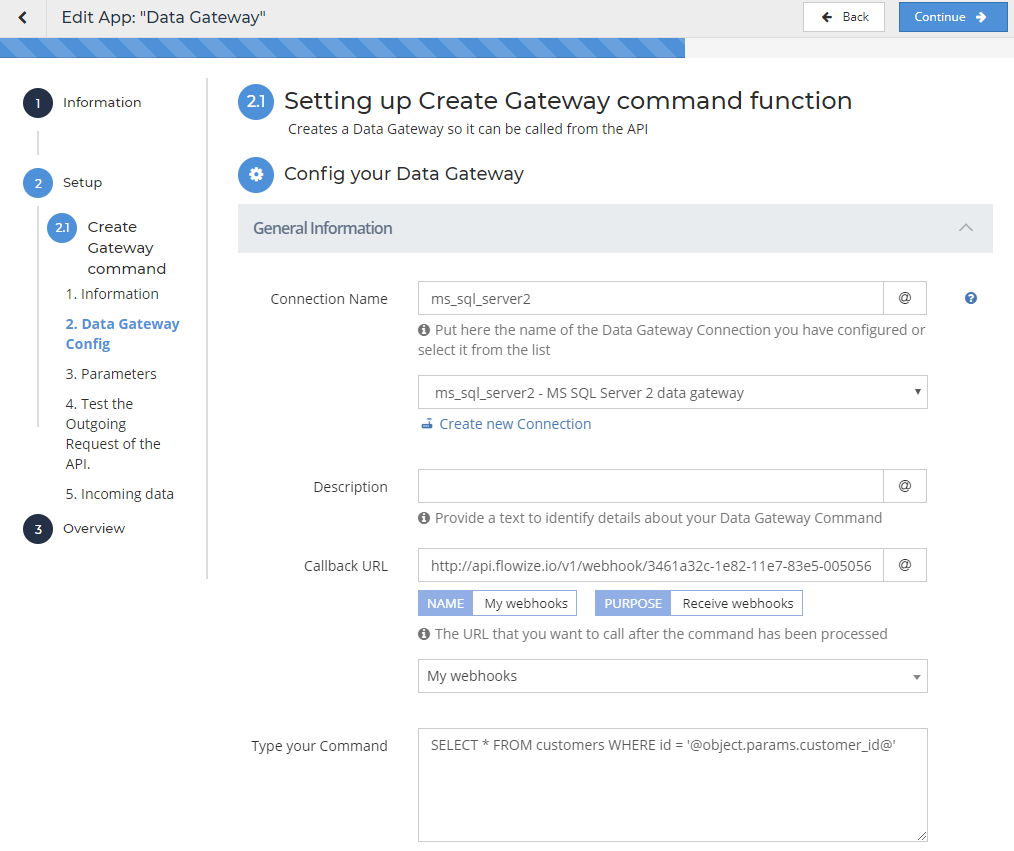
Connection Name
You need to select which ODBC connection do you want to use to execute this command.
Callback URL
Type a URL or choose from one of the URLs that you already have configured in Flowize, like a Webhook URL. In this URL, you will receive the data in JSON format.
Command
You can paste here any command that you want to execute: SELECT, INSERT, UPDATE, DELETE, DROP … Whatever you want to be executed in your database. There is no restriction in what can be typed, so use it with care.
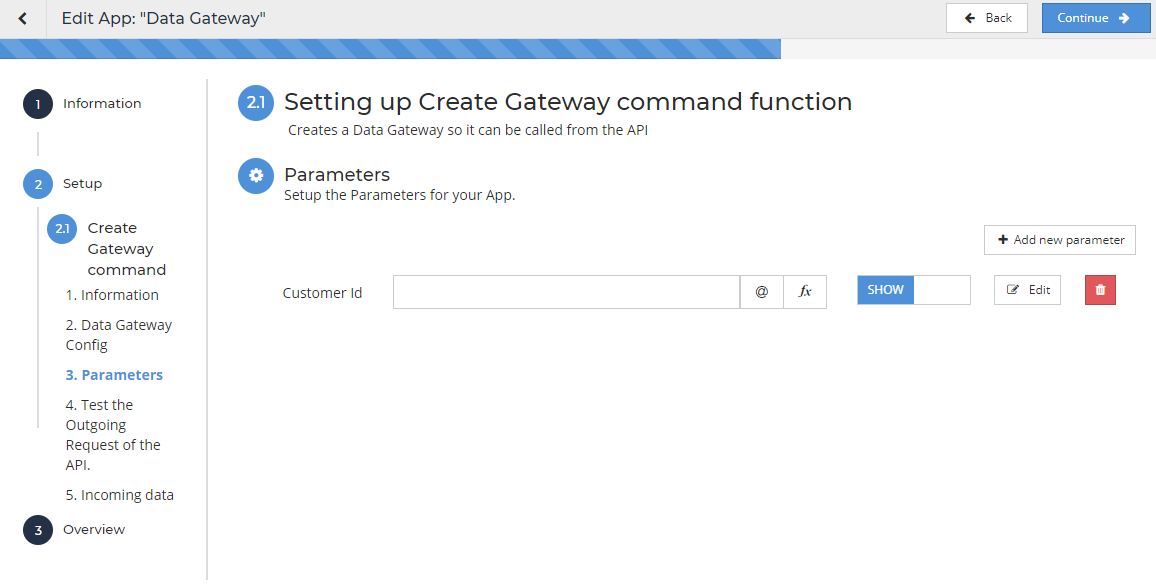
You can add @object.params.param_name@ in your command, and that way, a parameter will be created, which
can be configured later on in the flow.
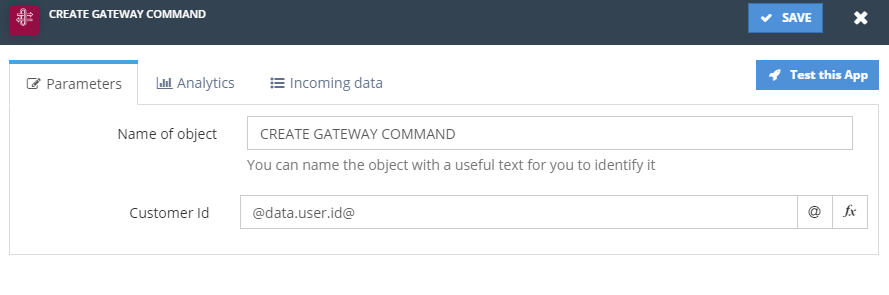
In this example, we have included @object.params.customer_id@ as we want to create a parameter called “customer_id”.
Ok, so now it’s time to create a flow to create the Dynamic ODBC Command.
ODBC Command Output
After executing the command, the output data will be sent to the Callback URL in JSON as an array of objects like:
[
  {
    "id": 1,
    "name": "John Doe",
    "birthday": "2019-10-12",
    "age": 23
  },
  {
    "id": 21,
    "name": "Jane Doe",
    "birthday": "2019-06-10",
    "age": 34
  }
]
ODBC Service installation
In order to install the ODBC Service in a Windows machine, you need to download the following Windows Application:
Step 1. Select Install folder
Select the folder where the software will be installed. By default, it will be installed in your “Program Files” folder.

Step 2. Select Shortcut icon
Choose if you want to install a shortcut icon on your desktop.
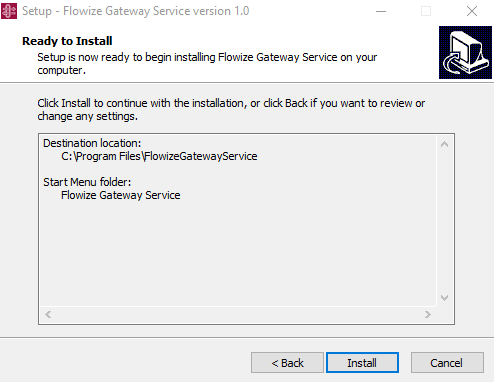
Step 3. Install
Just click “Install” and you are done! Let’s configure the GSA now, so it can receive commands from our system.
Step 4. Configure the service
When opening the Gateway Service Configuration App, you will see this screen:
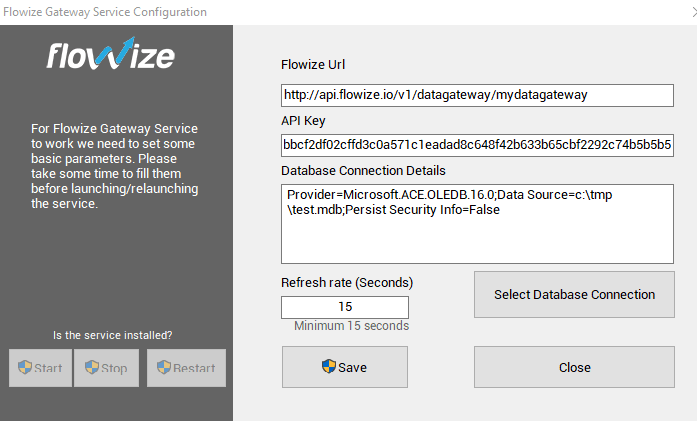
In this screen, you need to provide these details. Before filling up the details you should configure an ODBC Connection in our system if you haven’t done it before. We did it in this step.
Flowize URL: Here you need to paste the URL provided in our system after creating the ODBC Connection.
API key: Paste here the API key provided for the same connection.
Refresh rate: This is the time interval, in seconds, that the Gateway service will wait between calls to our system to ask for commands to execute. So, while there commands in the queue, the Gateway Service App will keep asking our system API for the next command. When there are no more commands to be executed, then it will wait the amount of time defined in “refresh rate” between calls to ask for new commands.
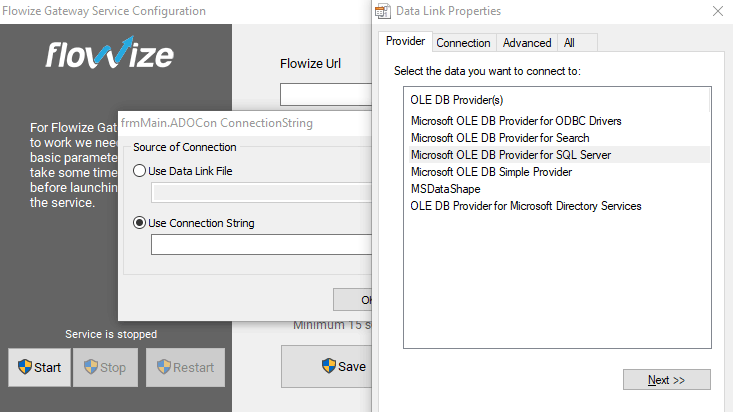
Database connection: Clicking on the button will allow you to configure the database connection needed to execute the commands received from our system.
Your GSA is now configured, and you only need to “Start” the service to start receiving and executing commands from Flowize.