Tables
You can use the Tables feature to store data as you would do in an SQL database. You'll be able to use this data across different data records and also in your Websites and Direct URLs.
Even though a Keystore and a Table might seem the same, there are some differences that we describe below:
The overview will show all tables created in your Project, and you will have the control of creating, editing, deleting or accessing to the data store in each one.
Create a Table
- Find Table section in the menu (Storage -> Tables) and then click on the "New Table" button.
- Once you are in the create view, then give a name and a description (this one is optional) to the table.
- Afterwards, you will be able to add the columns as needed by clicking on the button “New column”. Please check the below picture. Don't forget to mark the column as "indexable" if you need to perform SELECTs based on that field.
Import / Export Data
Two new tabs are shown in the editing page after creating the table:

Import
The import tool allows to preload data into your table. The data has to be in CSV format and can be pasted directly or uploaded.
Once it is imported, the system will show a preview where you will be able to change the parameters if there are not correct otherwise you can press the button “Import data” to start the import process.
For example the list of countries that we are going to use it to show in a signup form or the list of users with their credentials to use them in a backend website.
Export
The export tool allows you to extract the data that is stored in your table. The data is exported in CSV format, and some parameters can be configured, like the headers or the delimiter used. Whenever you press on the "Download data" button, the export process will start.
View Data
The data inserted in the tables can be visualized by pressing the "Data" button from the edit view or in the overview section (Data option in Actions menu).
Once you are inside the Data view from a table, then you will be able to check the rows store in the table, search for/update records and also insert new rows if you needed.
One important thing is that you only can search for data using the fields that you marked as indexes.
Usage
Once you have tables created in your Project, then you can use them inside workflows and websites content.
Workflows
Once you have created the table, you'll find a new app in the Database tab ![]() in
your workflow apps palette with the name of your table.
in
your workflow apps palette with the name of your table.
After dragging the “Query Table credential” app to the canvas of your workflow, then you will be able to query your table.
| Instruction | Usage |
|---|---|
| SELECT | It will retrieve all the rows matching with the condition you indicate (eg.: date_created greater than 2019-12-31) |
| INSERT | Inserts a row in the table writing all the columns set in the app |
| UPDATE | It will update the indicated columns of the selected rows |
| DELETE | Delete rows matching with the condition set |
Extra parameters that we can define in the App:
- How to order the results
| Ordering by | Result |
|---|---|
| Column | The result will be ordered by the column selected |
| Direction | The result will be ordered Ascendant (ASC) or Descendent (DESC) |
- How many results you want to retrieve
| Parameter | Result |
|---|---|
| Limit | The App returns a maximum of 100 results |
| Offset | The number of results to skip before returning anything |
You can order the outputted results by column and direction. You can also limit the number of results (maximum 100).
Login workflow using tables
This use case is a simple example which is usually necessary when you need to create a backend or a form using Flowize. Imagine that you need to create a Sign in and the sign-up page, where users need to introduce their credentials ( username, password) or fill the sign-up form to generate a new user inside your website. On that case, we need to create our table "credentials" where we are going to store the user credentials and the DateTime so the system will check if the user is already in our table or not.
Once we have the table created, then we need to prepare our workflow. Let's call it "credentials_controller".
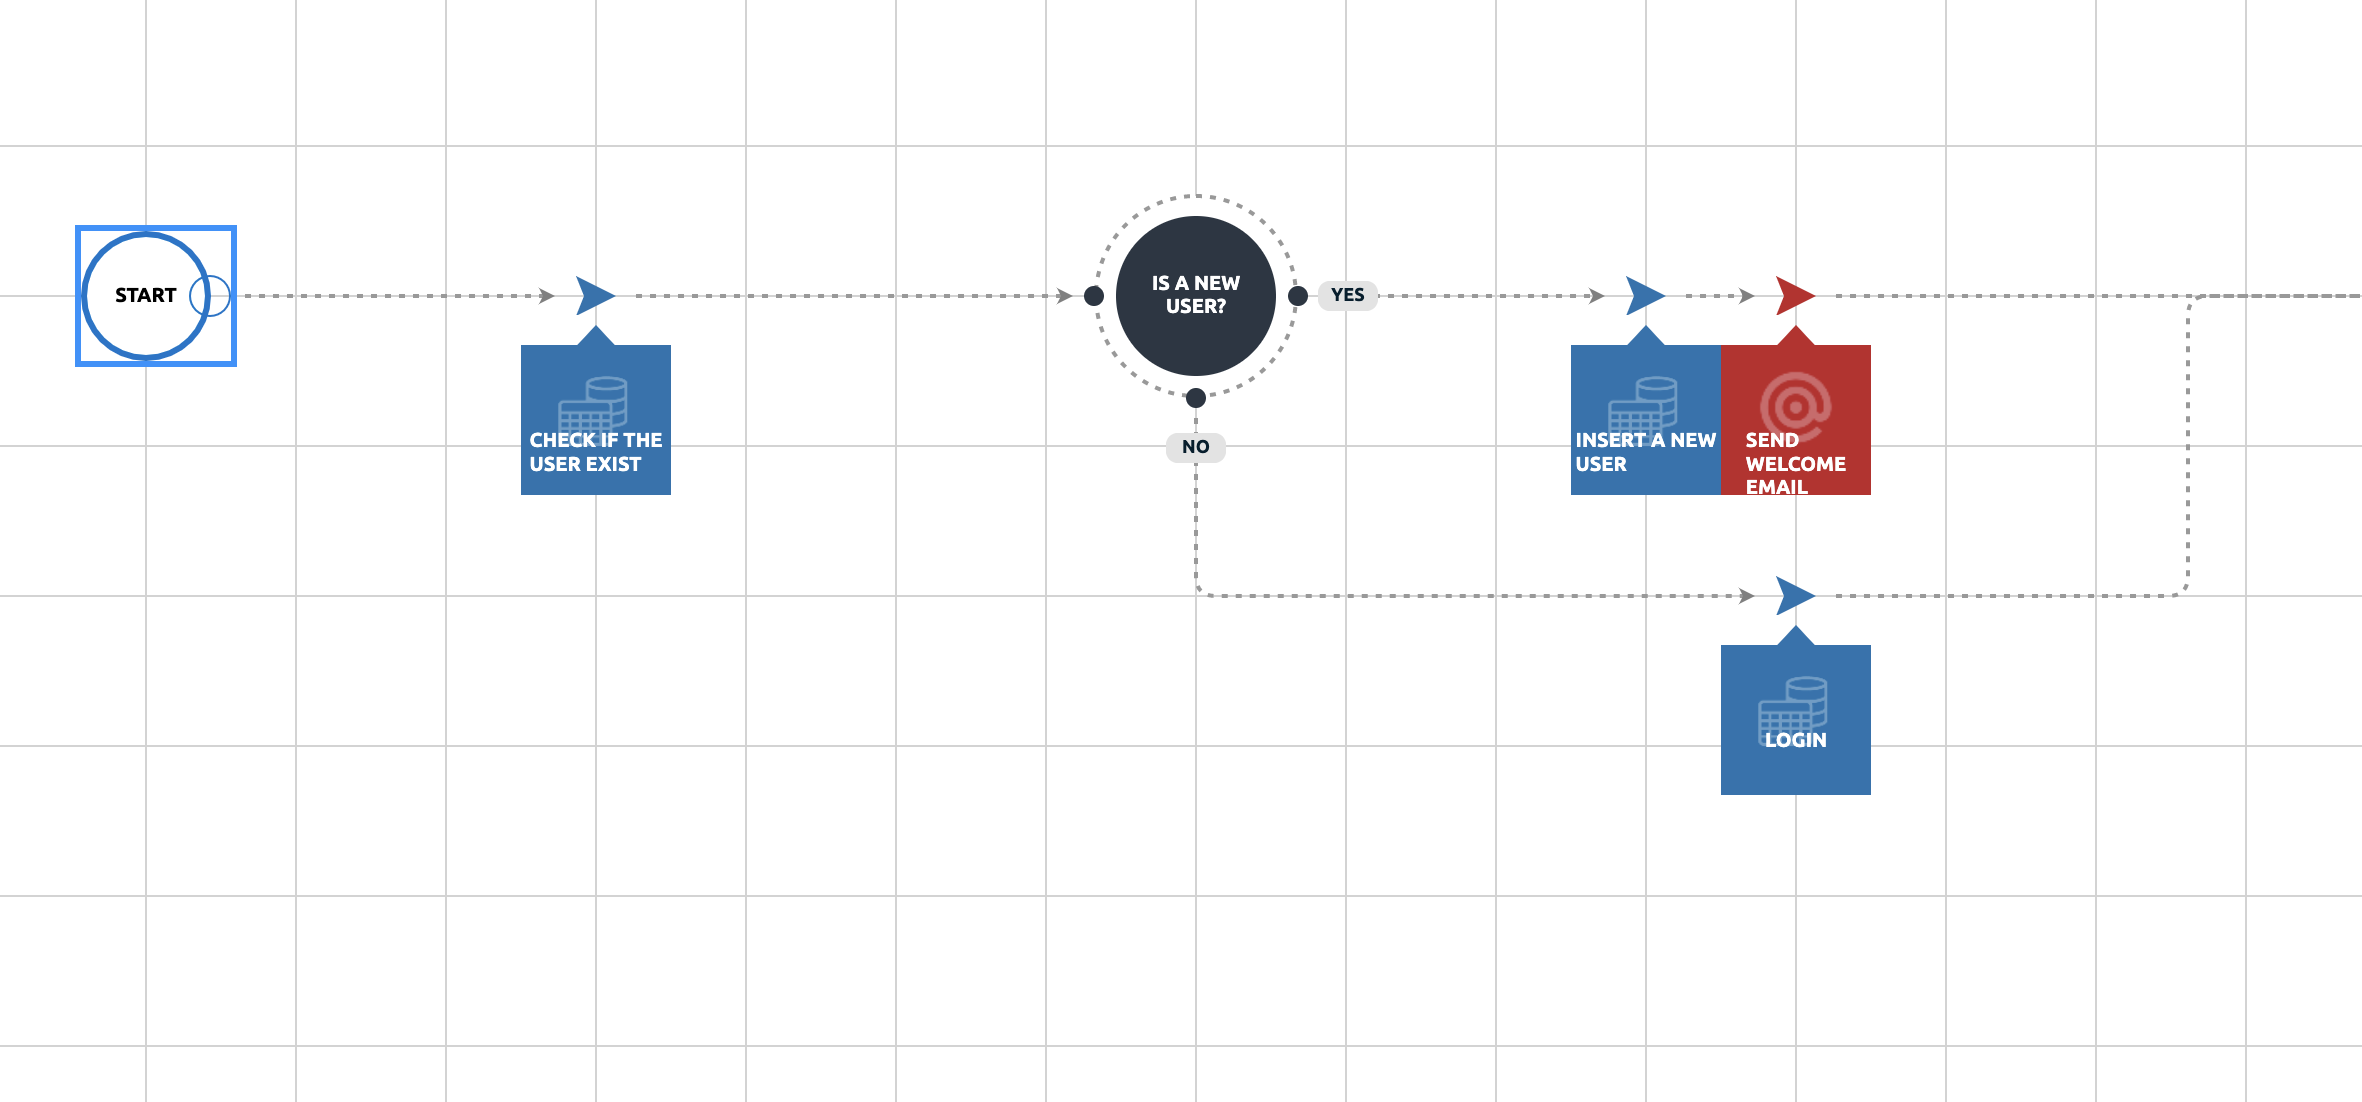
On the above picture we can see that the workflow will make a query on the table "credentials" to check if the user exists and storing the Datetime value on the table, otherwise it will create a new user, and it will send the "Welcome" email.
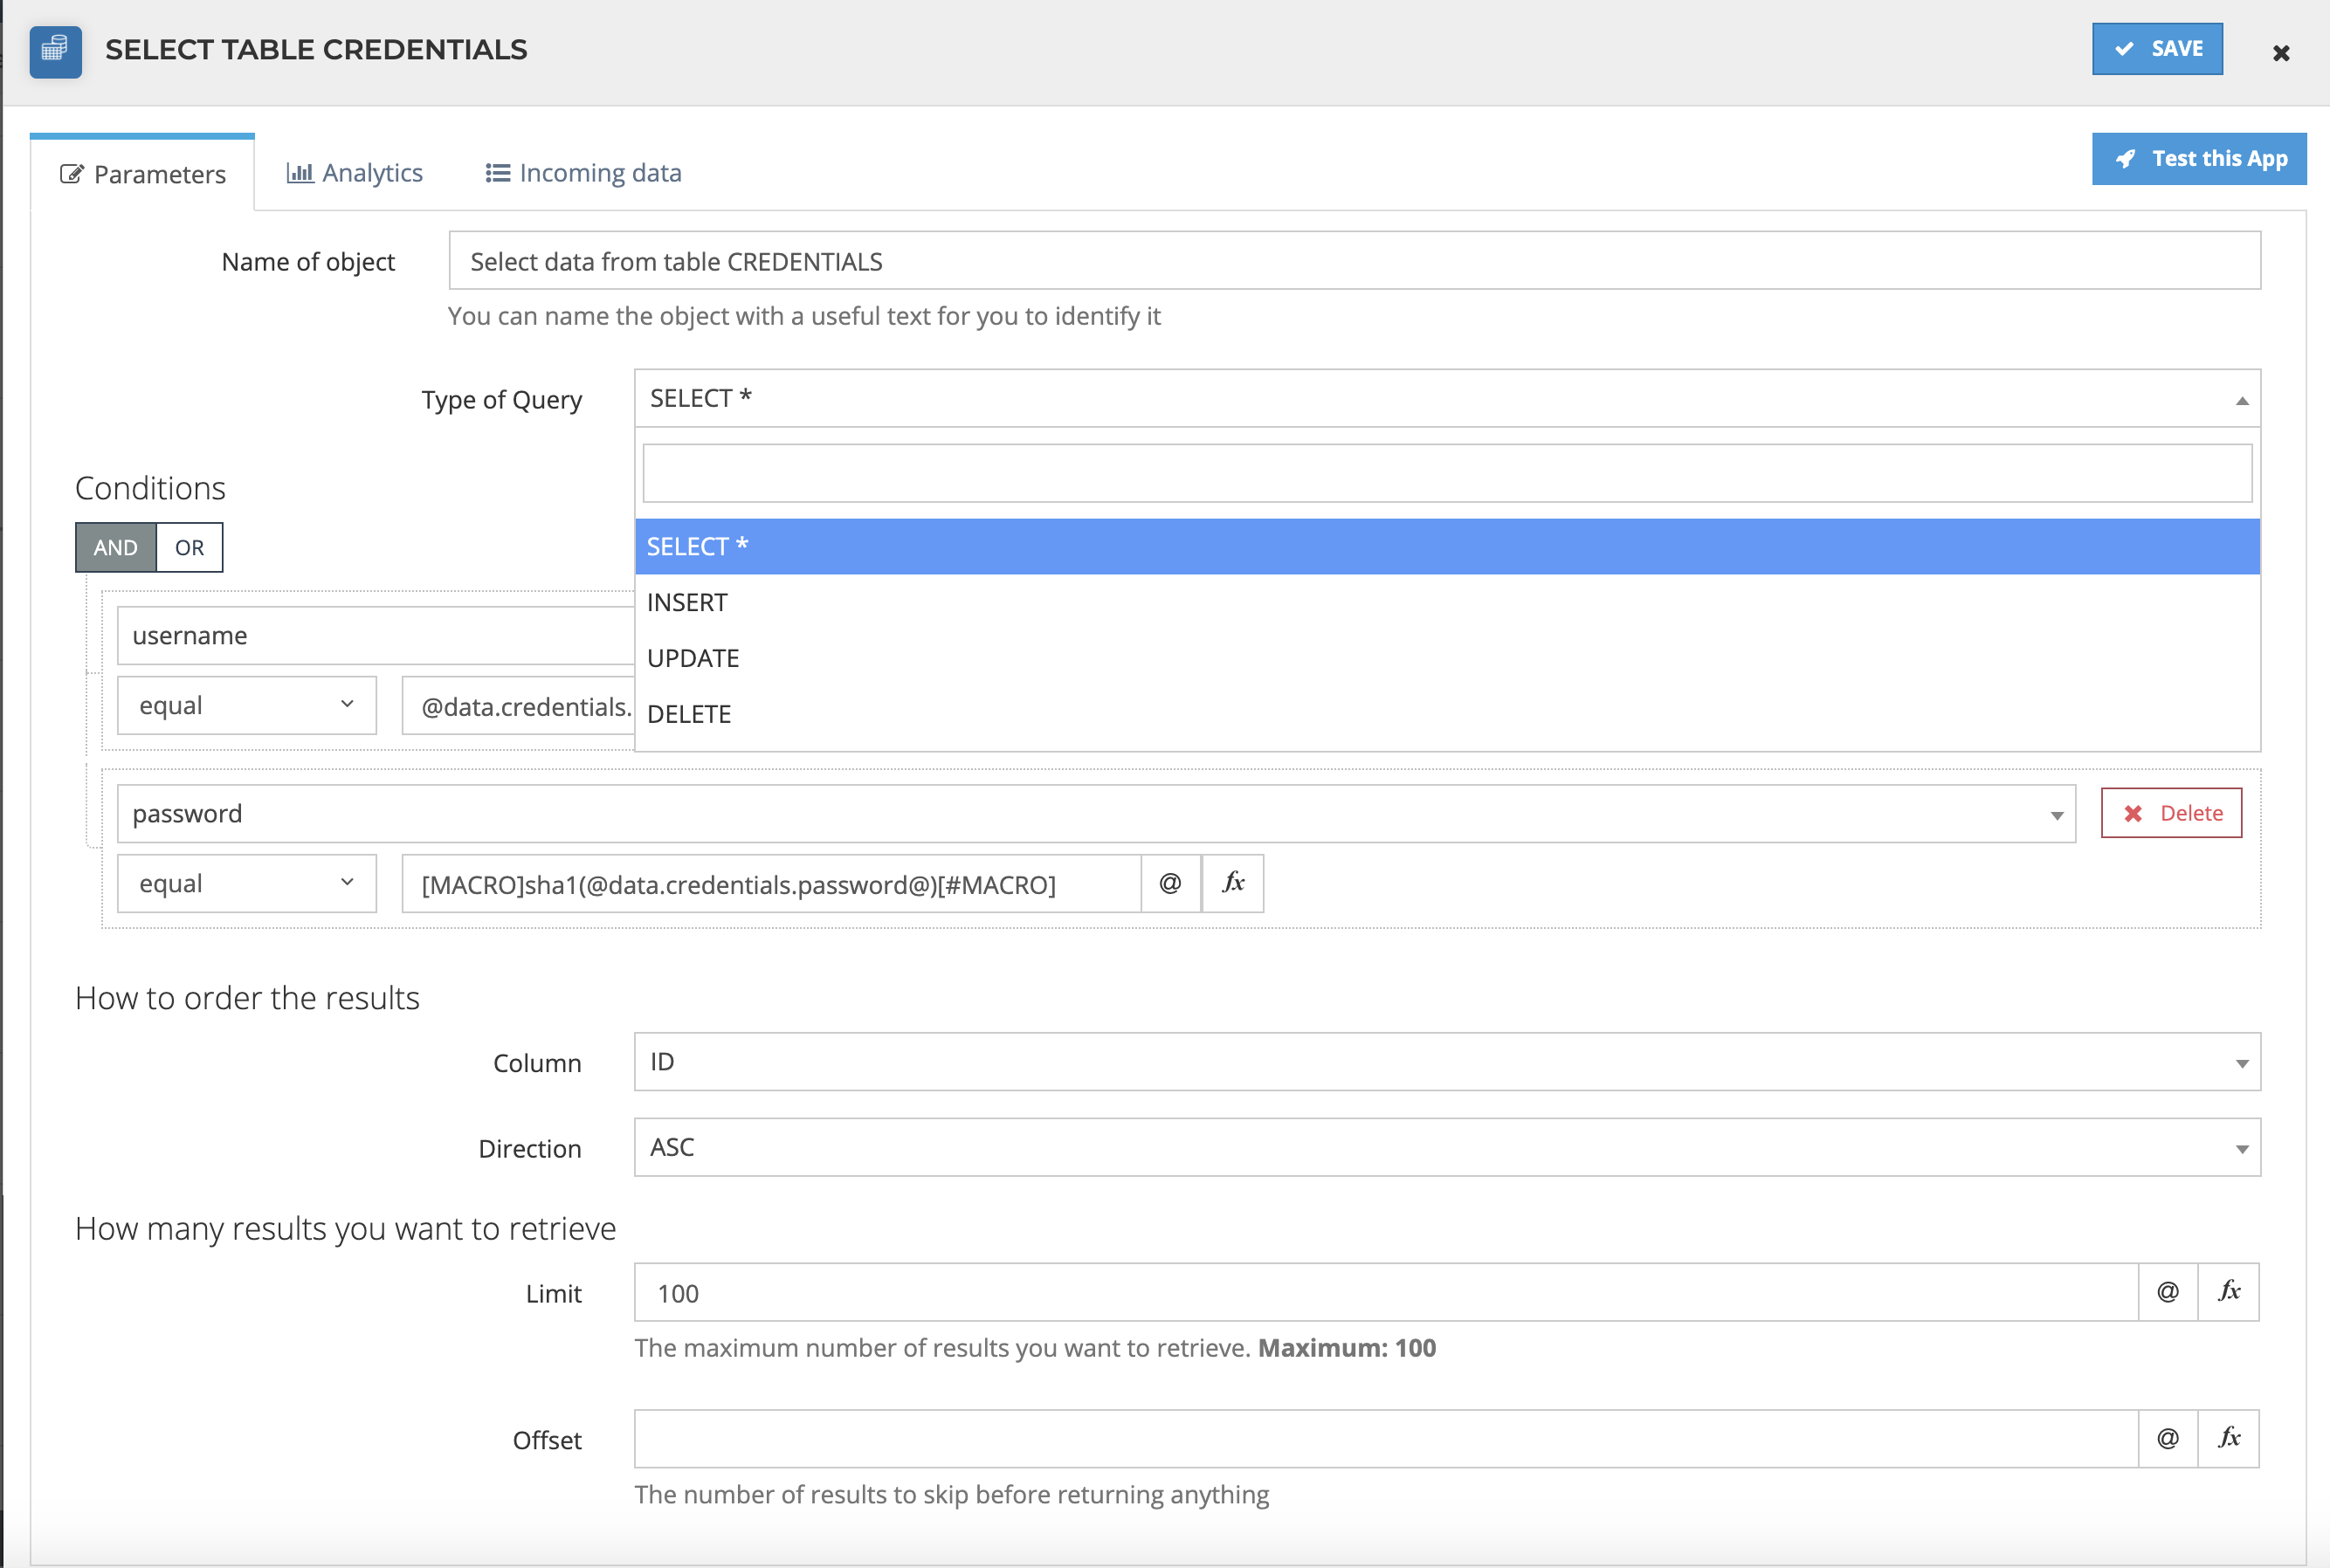
To check if the user exists we need to prepare the SELECT query using the table function that we dragged on the canvas. This function will check the data values used (username and password) against the two columns that we defined on the table credential.
This App will get a response with the following payload:
{
  "table_name": "credentials",
  "type": "SELECT",
  "error": "",
  "ids": ["3001"],
  "total": 1,
  "max_results": 1,
  "start_at": 0,
  "limit": 100,
  "offset": 0,
  "next_element": 1
}
And the meaning of each parameter is:
| Parameter | Usage |
|---|---|
| Table_name | This parameter is the name of the Table that you created |
| Type | This parameter is the query type. It can be a SELECT/INSERT/UPDATE/DELETE |
| Error | This field will be filled only if an error occurs in |
| Ids | The list of row ids that were retrieved in SELECT |
| Total | This is the number of results retrieved, applying the LIMIT. TOTAL will always be lower or equal to LIMIT |
| Max_Results | This is the total number of results retrieved, without applying the LIMIT |
| Start_at | The position of the first element retrieved in this query. It always coincide with the OFFSET of your search query |
| Limit | The maximum number of results you want to retrieve. You cannot retrieve more than 100 per query. By default is “100” |
| Offset | The number of results to skip before returning anything. By default is “0” |
| Nex_element | The position of the next element to be retrieved. If you put this value in the OFFSET of your following search query, you can throw all the results of your query |
This App will return an array of rows for which we will able to access to the information
using @table.[table_name].[index position].[column_name]. For instance, in our example, if we want to get the username
to be used in another app, then we need to type: @table.credentials.0.username@
The data that the tables are storing in Flowize Designer are not moving to the environments . This data has to be imported in the environment again.